Getting Started with Leads
Overview
In this section we will explain Leads, what they are and how they work as well as walk through the Merchant Portal setup and configuration for your Post-Purchase Lead Email tools.
This feature needs to be turned on by our team
The Lead Email Management functionality needs to be enabled by our team per your request. Please contact our associates via your Merchant Portal requesting Post-Purchase Leads be enabled. You will not see the Leads Email Management tab in the Merchant Portal until you have the feature enabled.
Creating Leads
Before you start selling protection plans post product sale, you will first need to create a lead. Alead is a transaction where a product was purchased, but an extended warranty was not. Creating a lead will allow us to keep track of that transaction so that you can more easily refer to it at a later time to sell a protection plan.
There are two ways to create leads:
- Create them via API.
- Send us a CSV with transactions that you want to convert to leads
We will work with you to decide which choice is best based on your email management system and development resources.
Create Leads via API
When you integrate with our Orders API lead tokens are automatically generated for eligible items. The Orders endpoint creates a representation of an order in Extend’s system. Orders should represent the complete order as processed through a merchant’s store, including line details that enable Extend to determine how to process each line. Extend will automatically categorize each order line item based on the information that is sent with it to create Lead Tokens for eligible items.
Once you have your unique Extend storeId, which you can from the Merchant Portal under Settings, simply use this endpoint to create lead tokens and contracts The API reference will tell you how to use the API and some best practices for when to create leads.
Send us a CSV with Transactions That You Want to Convert to Leads
Alternatively, you can create leads from a CSV, you’ll need to export past orders from your ecommerce platform or OMS into a .csv file to send to Extend. When you export your orders, please exclude those that have been returned or already refunded as well as those that are already protected.
To ensure you do not include products that have already been protected, just find and exclude any orders with an extend protection plan in your CSV. If you are having trouble with this, please reach out and we will gladly assist!
| Transaction ID | Transaction Date | Line Item Quantity | Line Item Price (in base units) | Product Purchase Price (in base units) | Product Reference ID | |
|---|---|---|---|---|---|---|
| The order number for the transaction | The email address of the shopper for the order that was created | The date the transaction was created | The quantity of the item sold in the transaction | The price of the line item at the time it was sold in base units (i.e. $25.99 should be passed as 2599) | The purchase price of the individual line item. This price includes any discounts applied to the product. | This unique identifier that identifies the product to Extend. |
*indicates that the field is required in order to generate a lead
**indicates that the field is utilized when making Email campaigns
It is important that the CSV provided is broken out per line item. For example, if a shopper ordered 2 different products in one order, they should be on separate lines in the CSV. You can find an example Here
Once you have the file, please send it to [email protected] with the subject line: {Merchant_Name} Leads Request.
Important Note:If your transaction export does not include the product reference ID, please include the line item name and SKU number in the CSV you provide and we can match the product to the appropriate product reference ID.
After we receive the CSV, we will convert the transactions into leads and send back an almost identical file with an added column called “Lead ID”. If a lead could not be created, we will provide details as to why:
| Transaction ID | Transaction Date | Line Item Quantity | Line Item Price (in base units) | Product Purchase Price (in base units) | Lead ID | Errors | |
|---|---|---|---|---|---|---|---|
| See Above | See Above | See Above | See Above | See Above | See Above | 987654321 | If there are any errors when creating the lead, they will show here. |
Enable Lead Emails
-
Log into the Merchant Portal .
2. On the left navigation bar, click on Leads .
3. Next Choose the Leads Email Management tab.
4. Then click the Checkbox that reads "Send emails to customers".
5. Choose the Marketing Lead Email Type.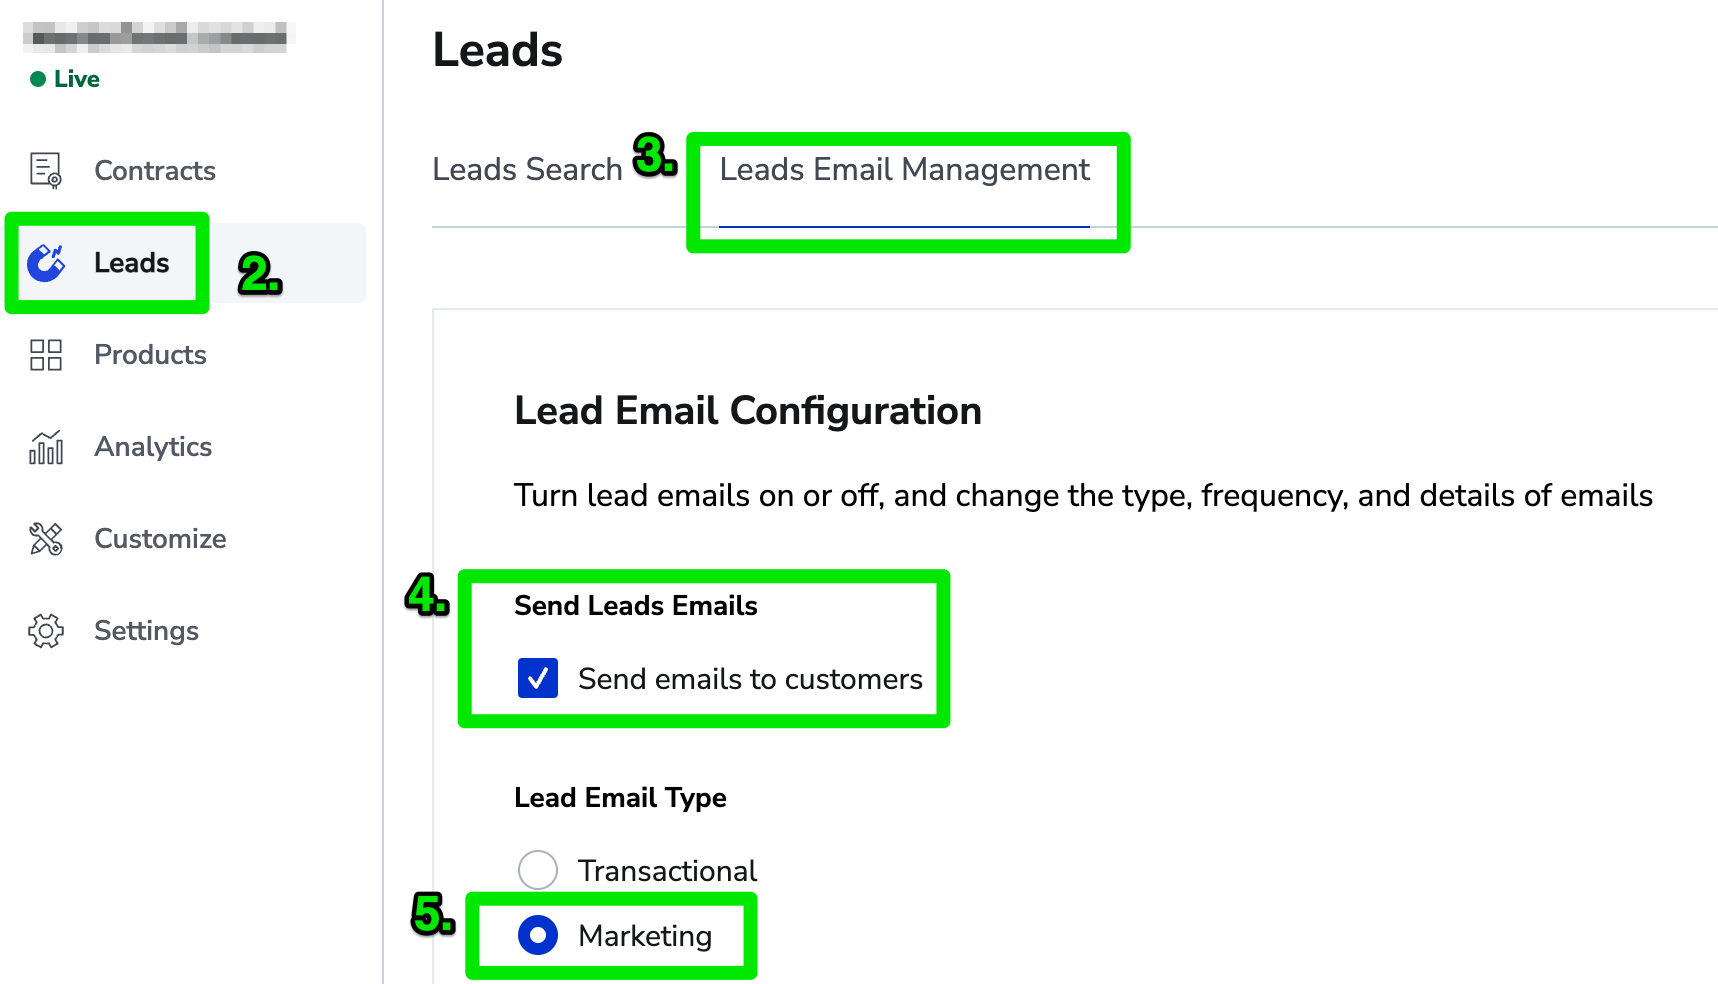 > 📘 Send Lead Emails > > This enables the automatic trigger event that will send a Post-Purchase Product Protection offer to a customer who has made a warrantable purchase on your store, but didn't include a Product Protection plan in their purchase. Toggling this off will prevent the auto emails from being sent out. 6. Now that we have enabled the Lead Emails we need to configure some settings around them:  * **Sending Email Address** - For this we suggest using the alias **[[email protected]](mailto:[email protected]) **, optionally you can also replace "marketing" with your store name if you prefer, but the email address has to end in **@extend.com**. * **Reply-to Email Address** - Here you can include your store's support email or any email you would find most appropriate for answering inquires around this opportunity. * **Call-to-Action** - This link is where your logo will lead the customer if they were to click on any logo you added to the email. We suggest you use your store's homepage.
This covers the basics for setting up and enabling your Lead Emails. Continue on to the next article to get into customizing and testing your emails out before pushing these out to any customers.
If you run into any issues during this process or have questions please reach out to our team through your Merchant Portal .
Updated 4 months ago