Leads Management
Search or filter your list of leads and generate post-purchase email campaigns. Copy a lead token URLs to share with customers.
Interacting with the Leads List
You can use the Merchant Portal to search and filter the leads records in your store.
NoteYou will only be able to search for leads after your first lead has been generated. To generate leads, integrate with Extend's Orders API or the Leads API.
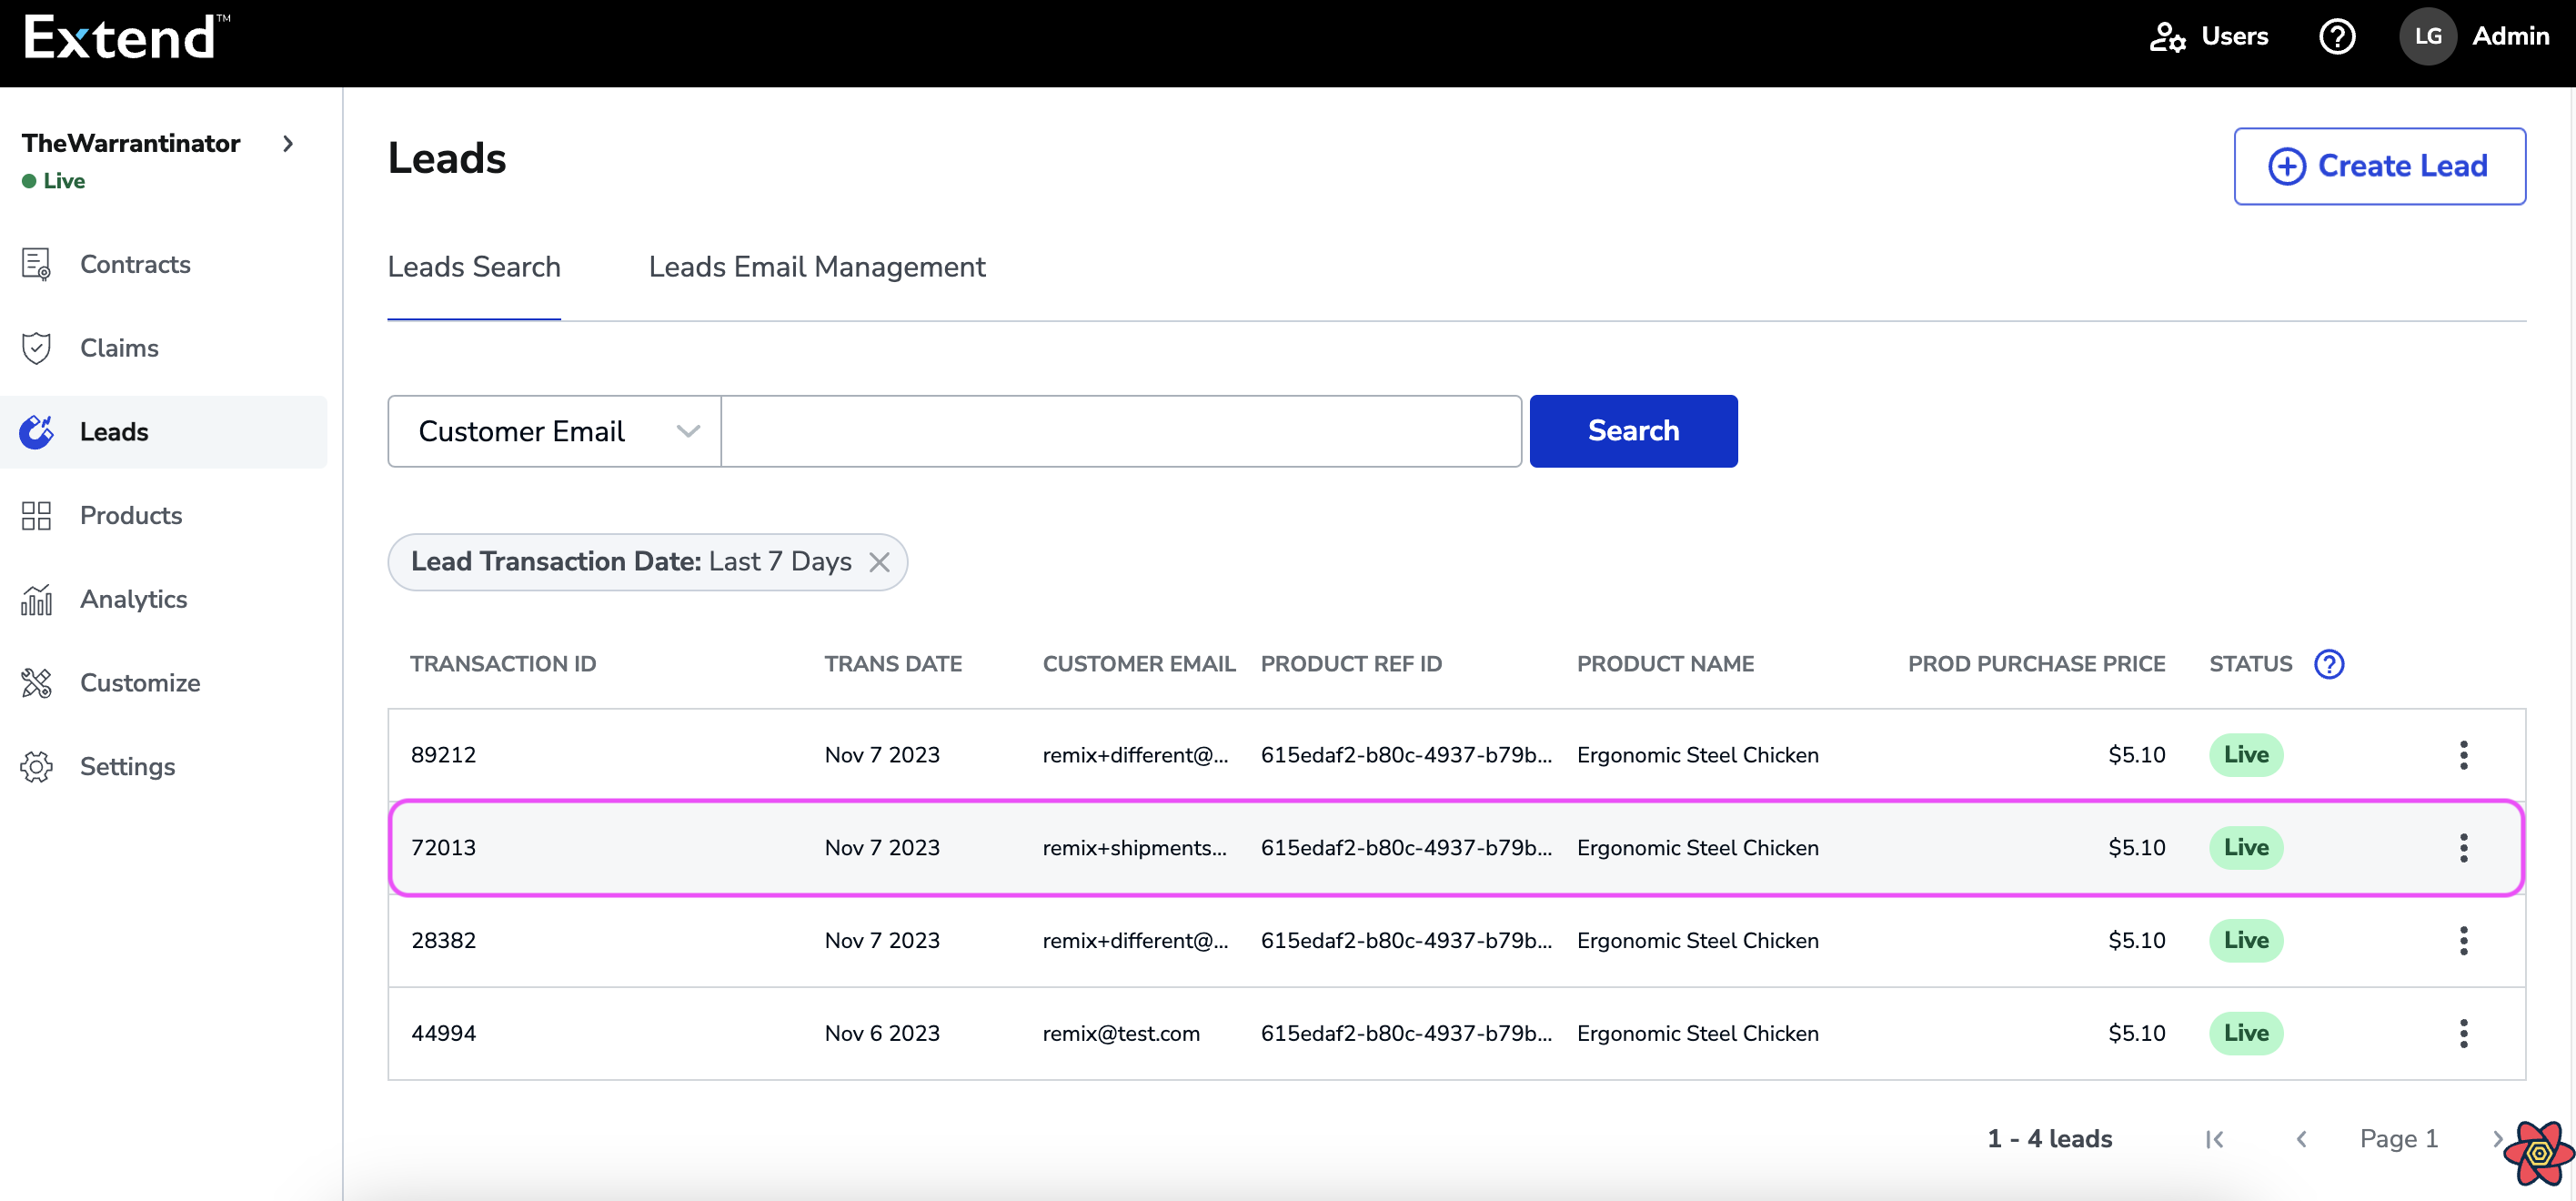
You can use the search bar at the top of the Leads List View to search your leads by Customer Email, Transaction ID, or Product Reference ID.
- Log into the Merchant Portal
- On the left navigation bar, click on Leads
- Select the parameter you want to search by using the search dropdown (Customer Email by default)
- Click the Search button

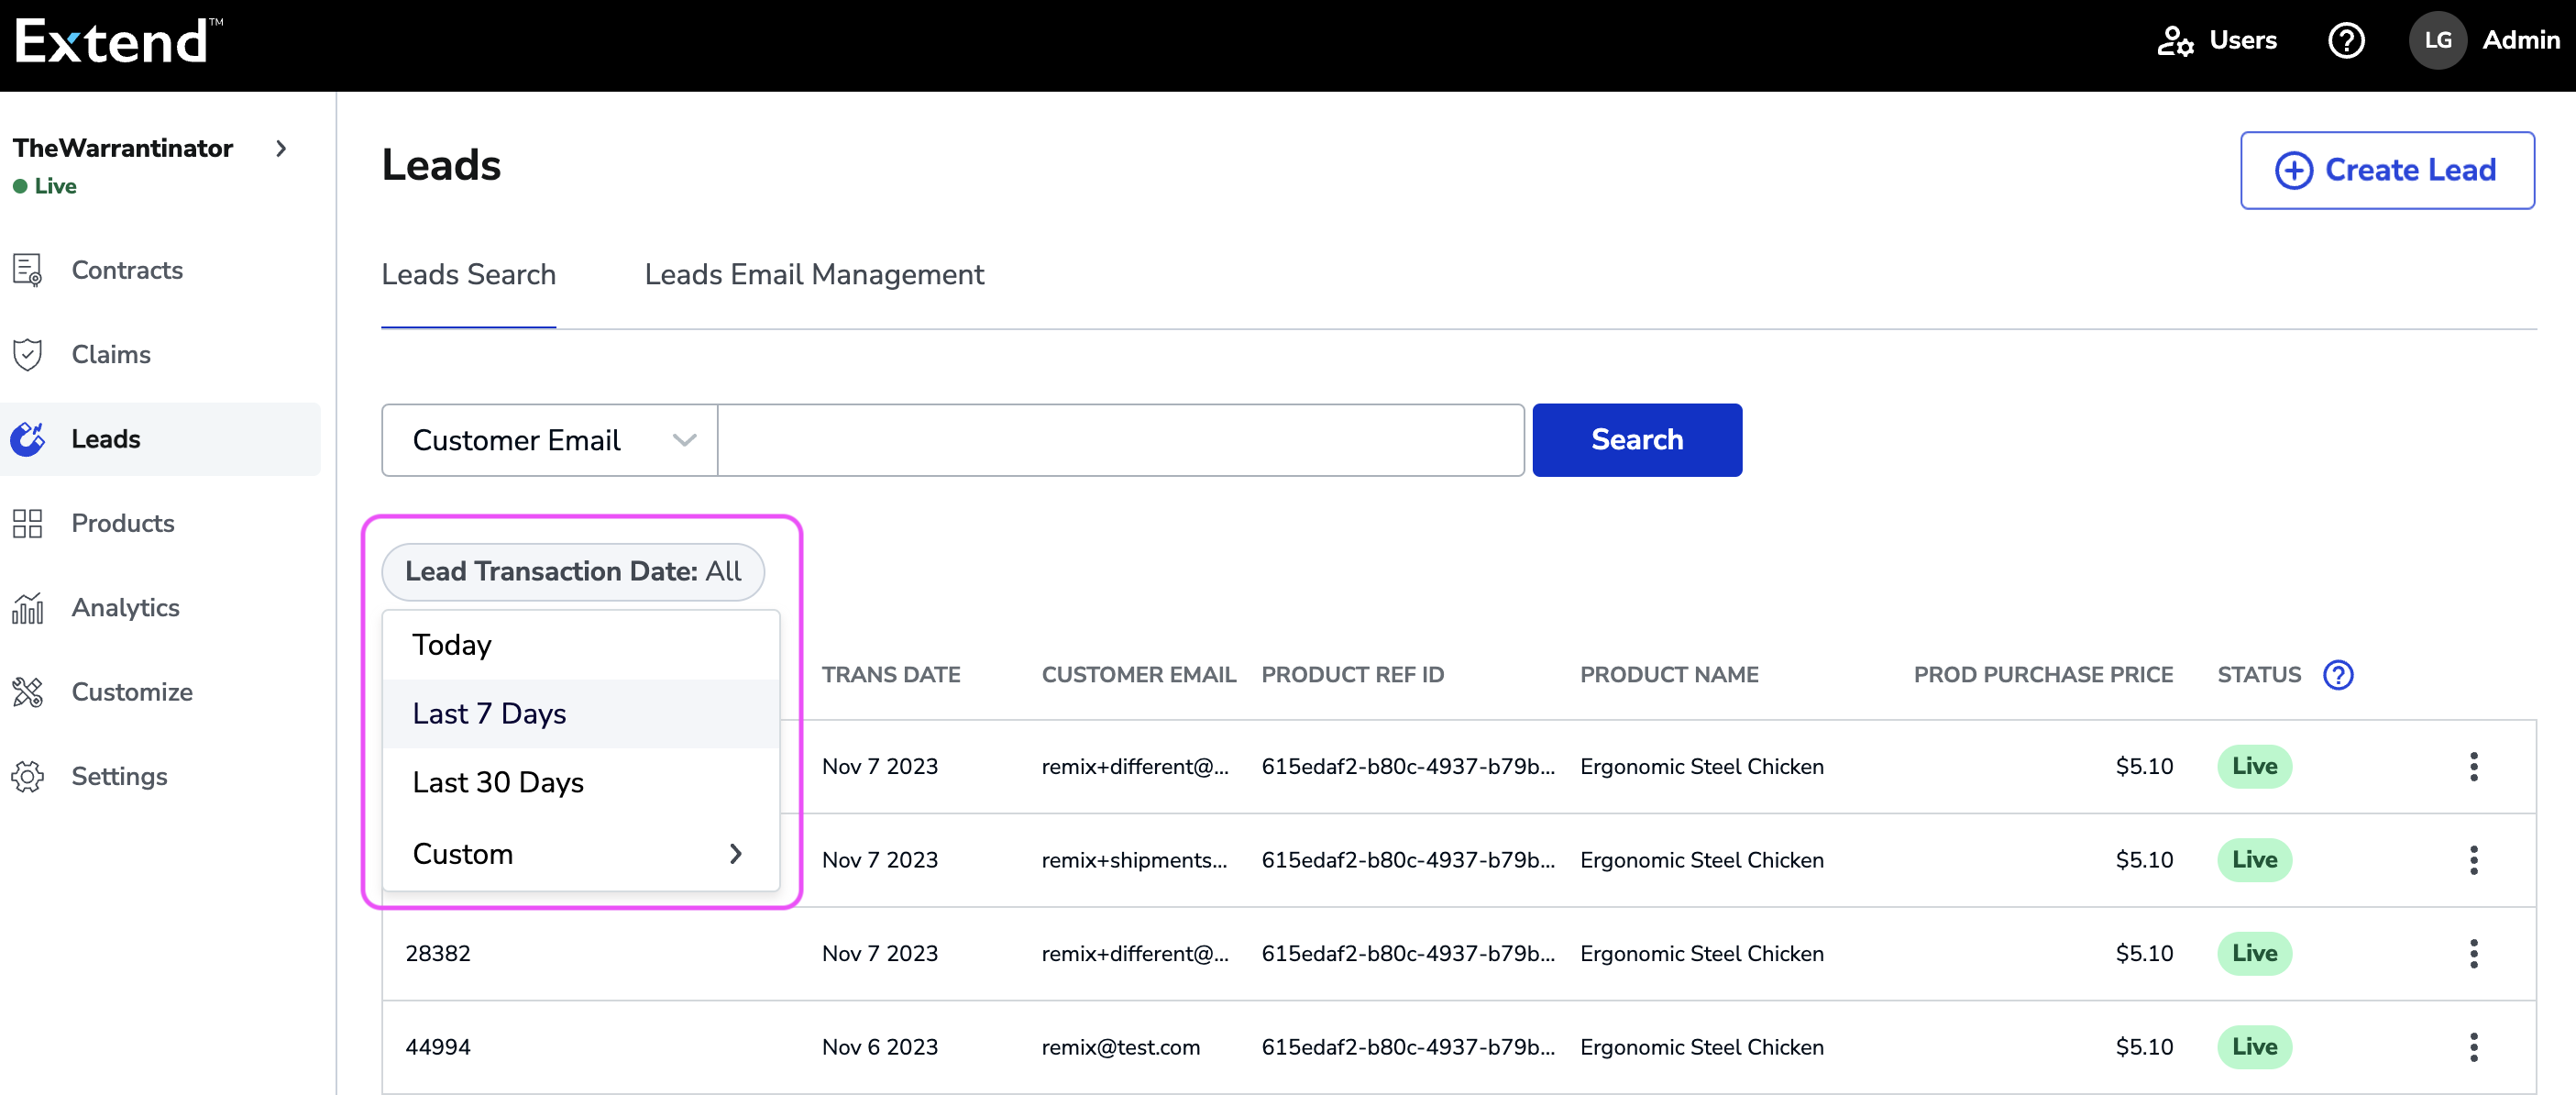
Applying the Transaction Date Filter
Click on the Lead Transaction Date chip to apply a date range filter on the Leads List View.
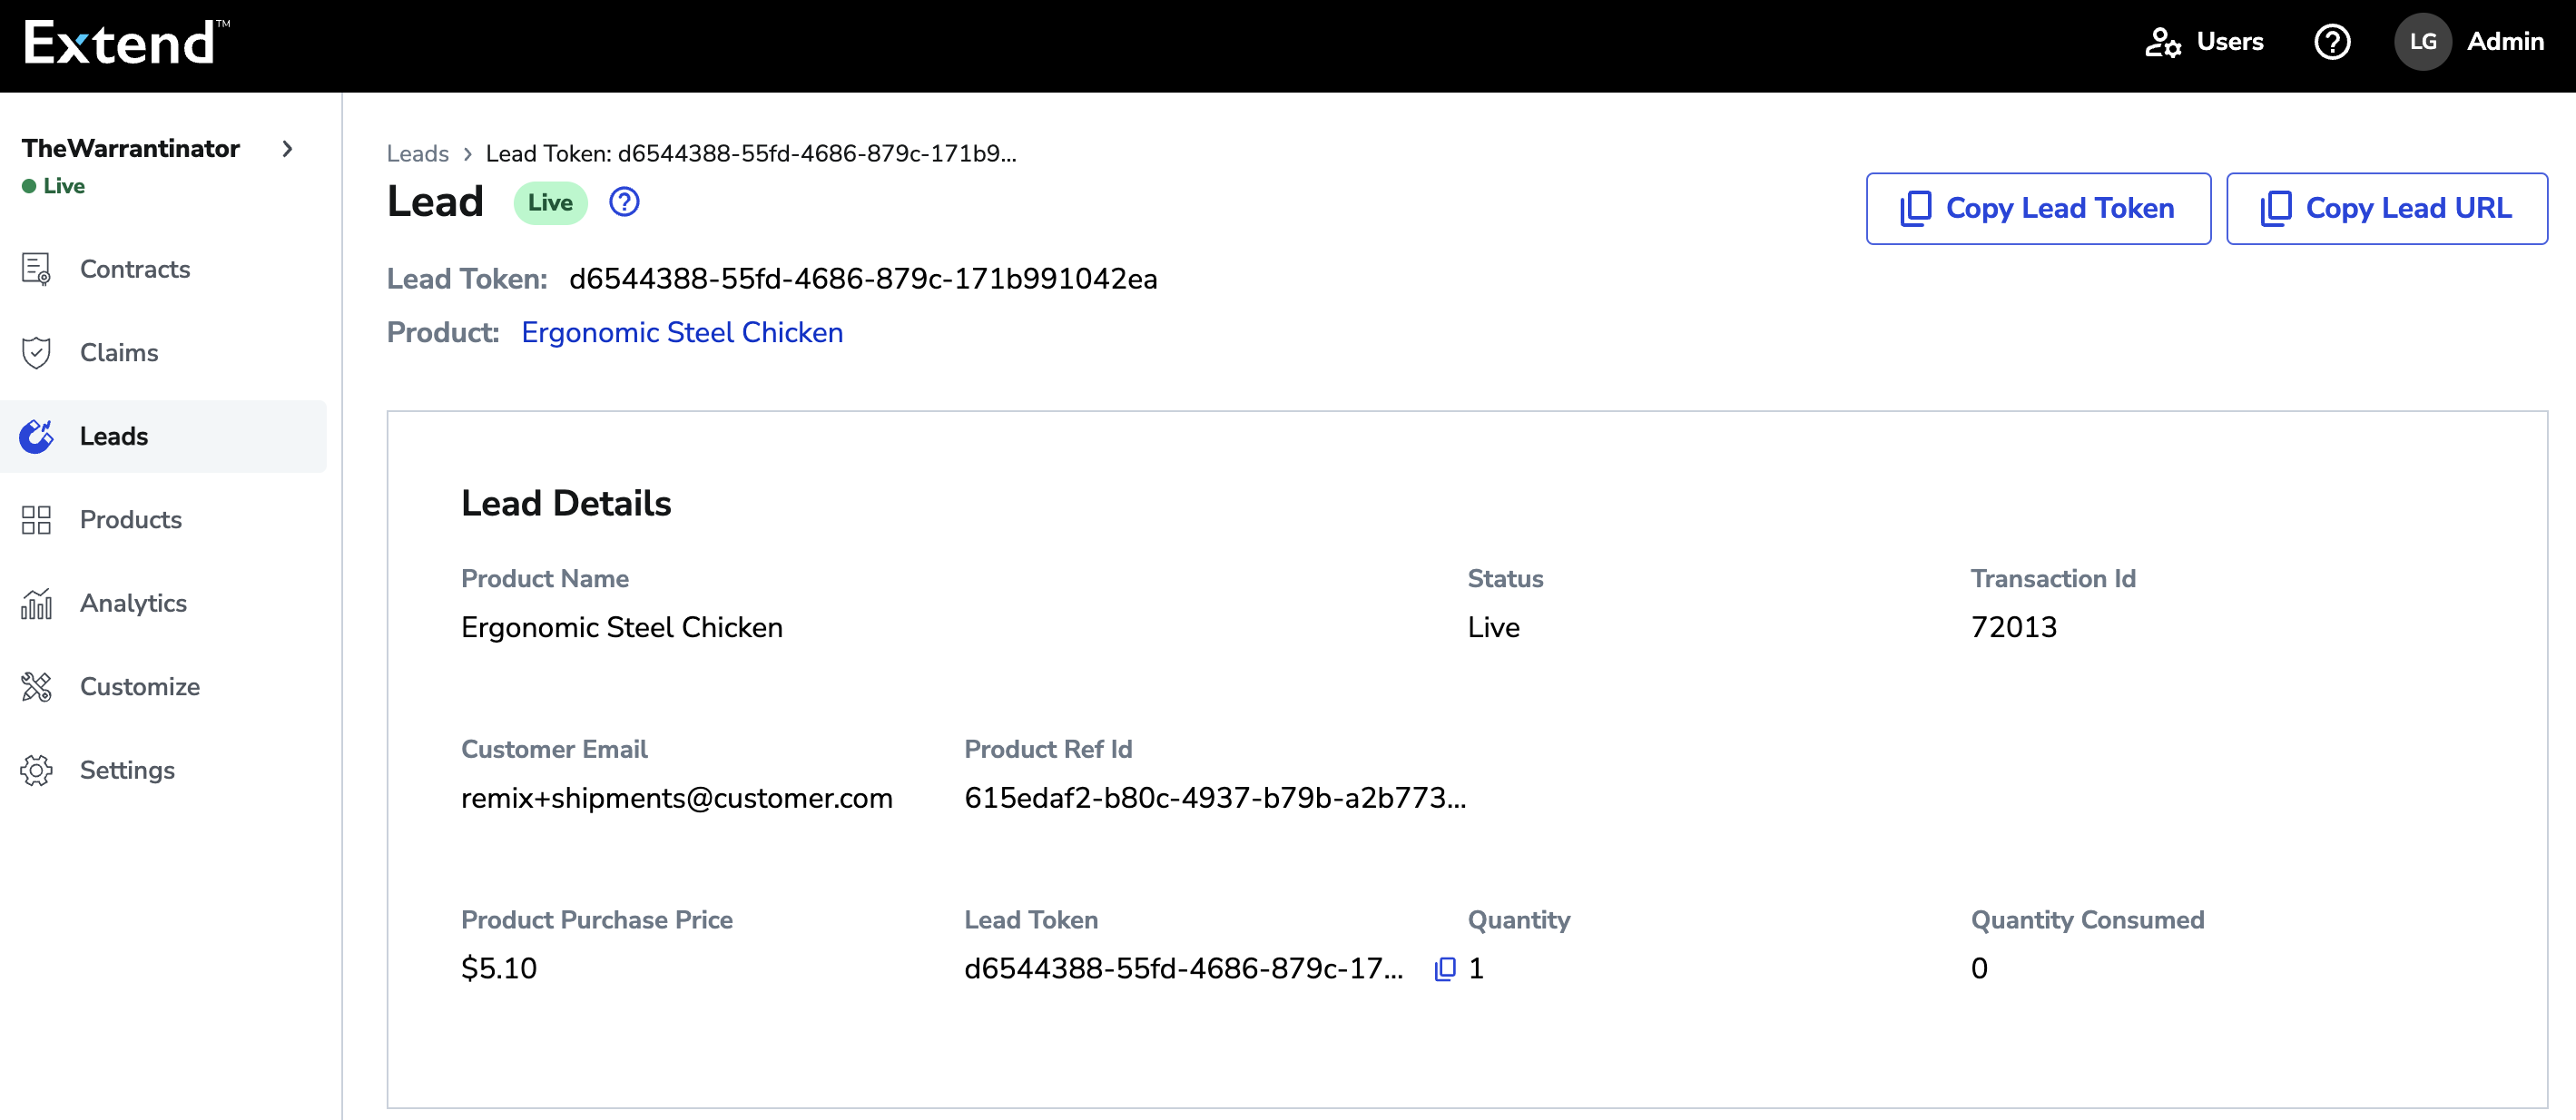
View Lead Details
You can use the Merchant Portal to drill into any of your leads and view information about the customer, product, status and more.
- Log into the Merchant Portal
- On the left navigation bar, click on Leads
- Search or filter to find a specific lead
- Click on the lead in the list view
Post-Purchase Upsell Email Management
This feature needs to be enabled by your MSMThe Lead Email Management functionality needs to be enabled by your MSM. Please contact your MSM and see Prerequisites for Extend’s PUE Module. You will not see the Leads Email Management tab in the Merchant Portal until you have the feature enabled.
In addition to viewing and copying Lead information, you can opt into having automated Post-Purchase Upsell emails sent to every eligible customer. The Leads Email Management feature allows you to do the following:
- Enable / disable automated Post-Purchase Upsell Emails being sent to customers
- Set / update the email type to be Transactional or Marketing based on your use case. Your selection determines the allowed values for Sending Email Address and Reply-to Email Address.
- Customize the logo, look and feel of your Post-Purchase Email to be different than your Contract purchase emails
- Trigger test emails of your Post-Purchase Email campaign to your email address of choice to preview the emails that your customers will receive
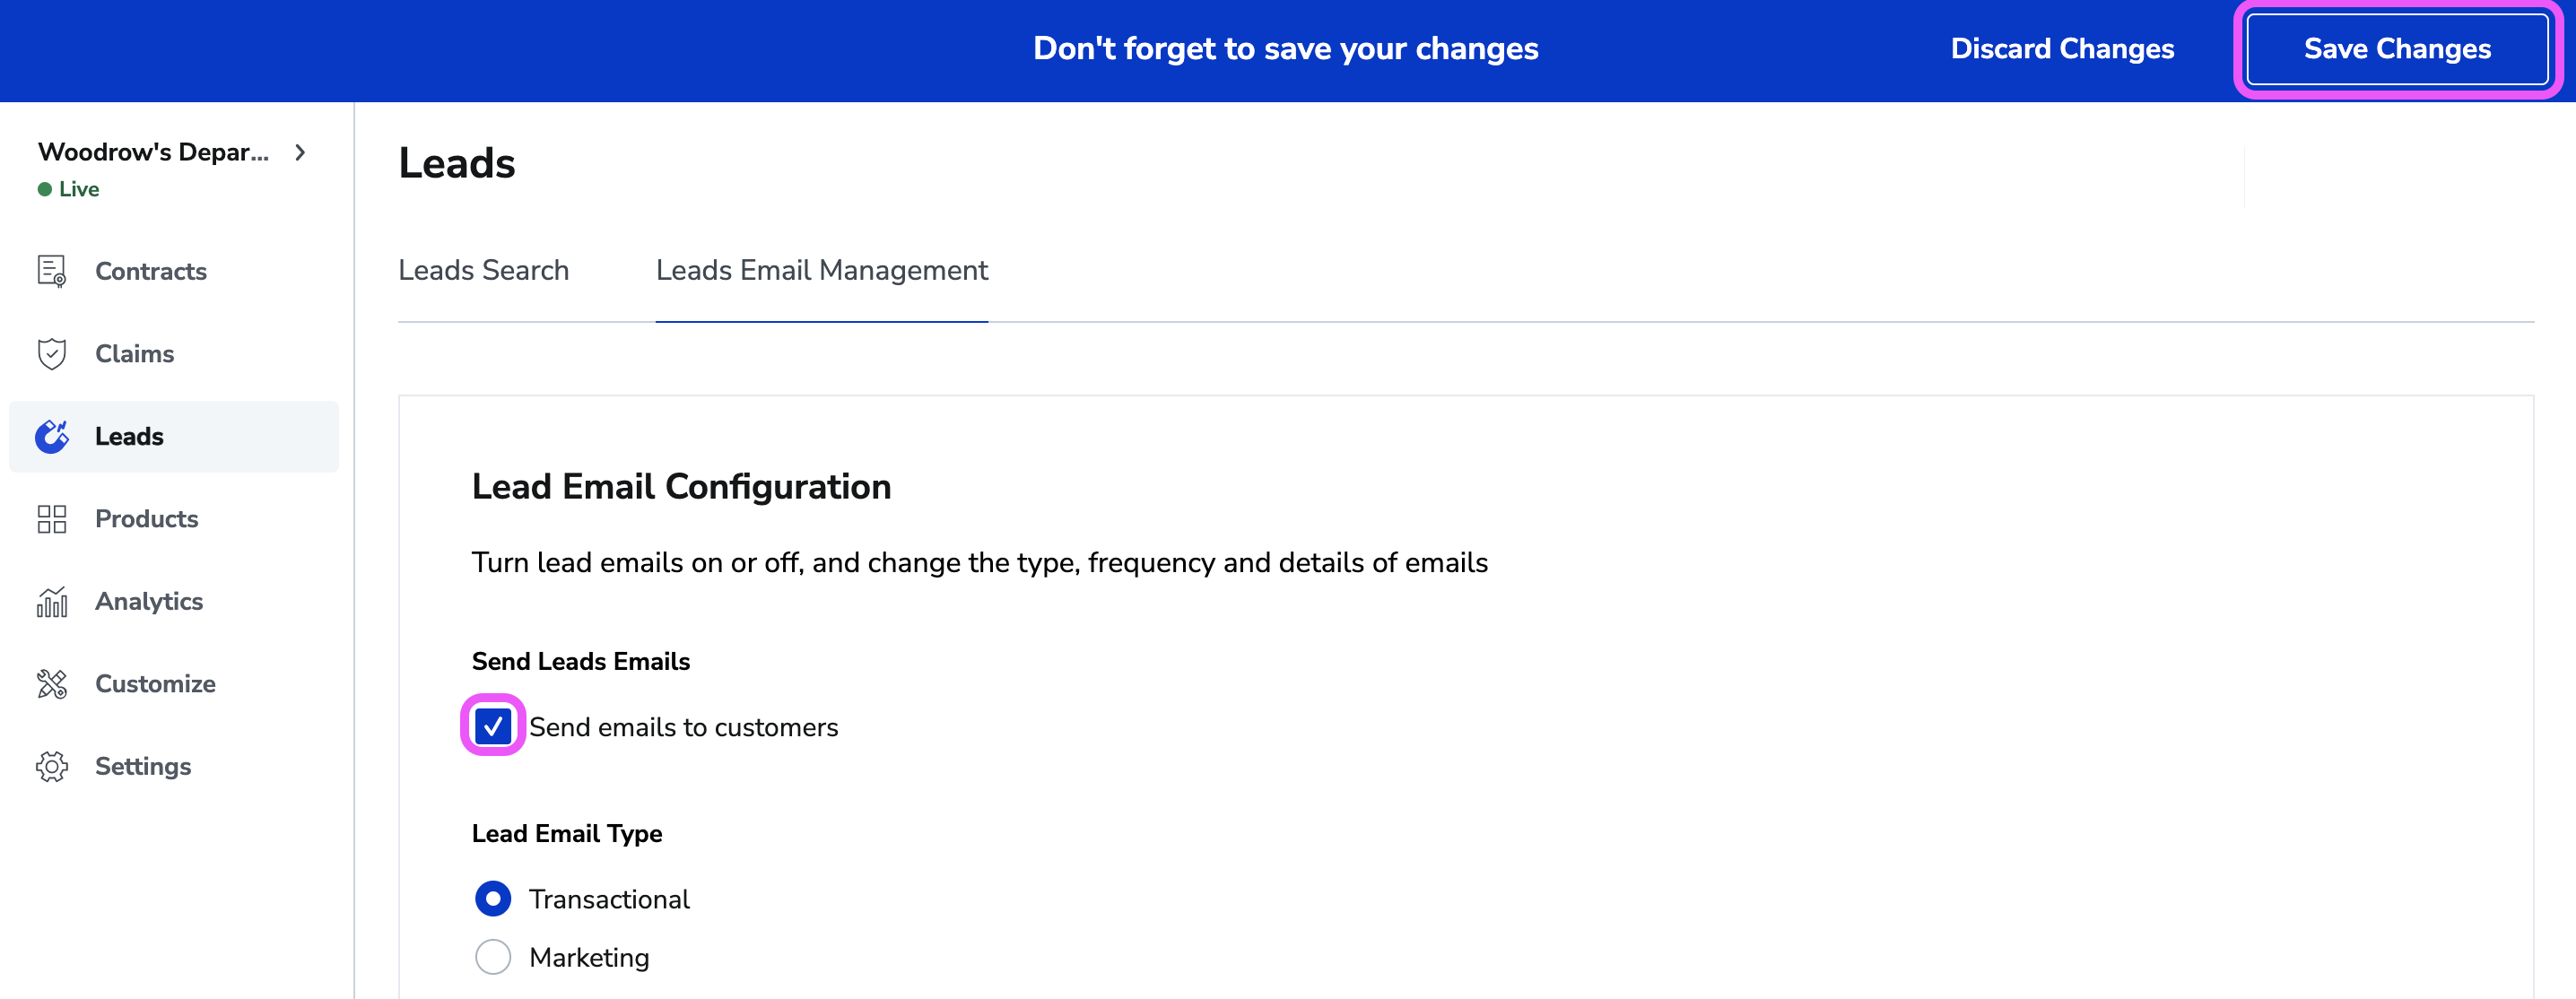
Enable / Disable Post-Purchase Upsell Emails
You can use the Merchant Portal to enable or disable automated Post-Purchase Upsell Emails to your eligible customers.
- Log into the Merchant Portal
- Click on the Leads tab
- Click on the Leads Email Management tab
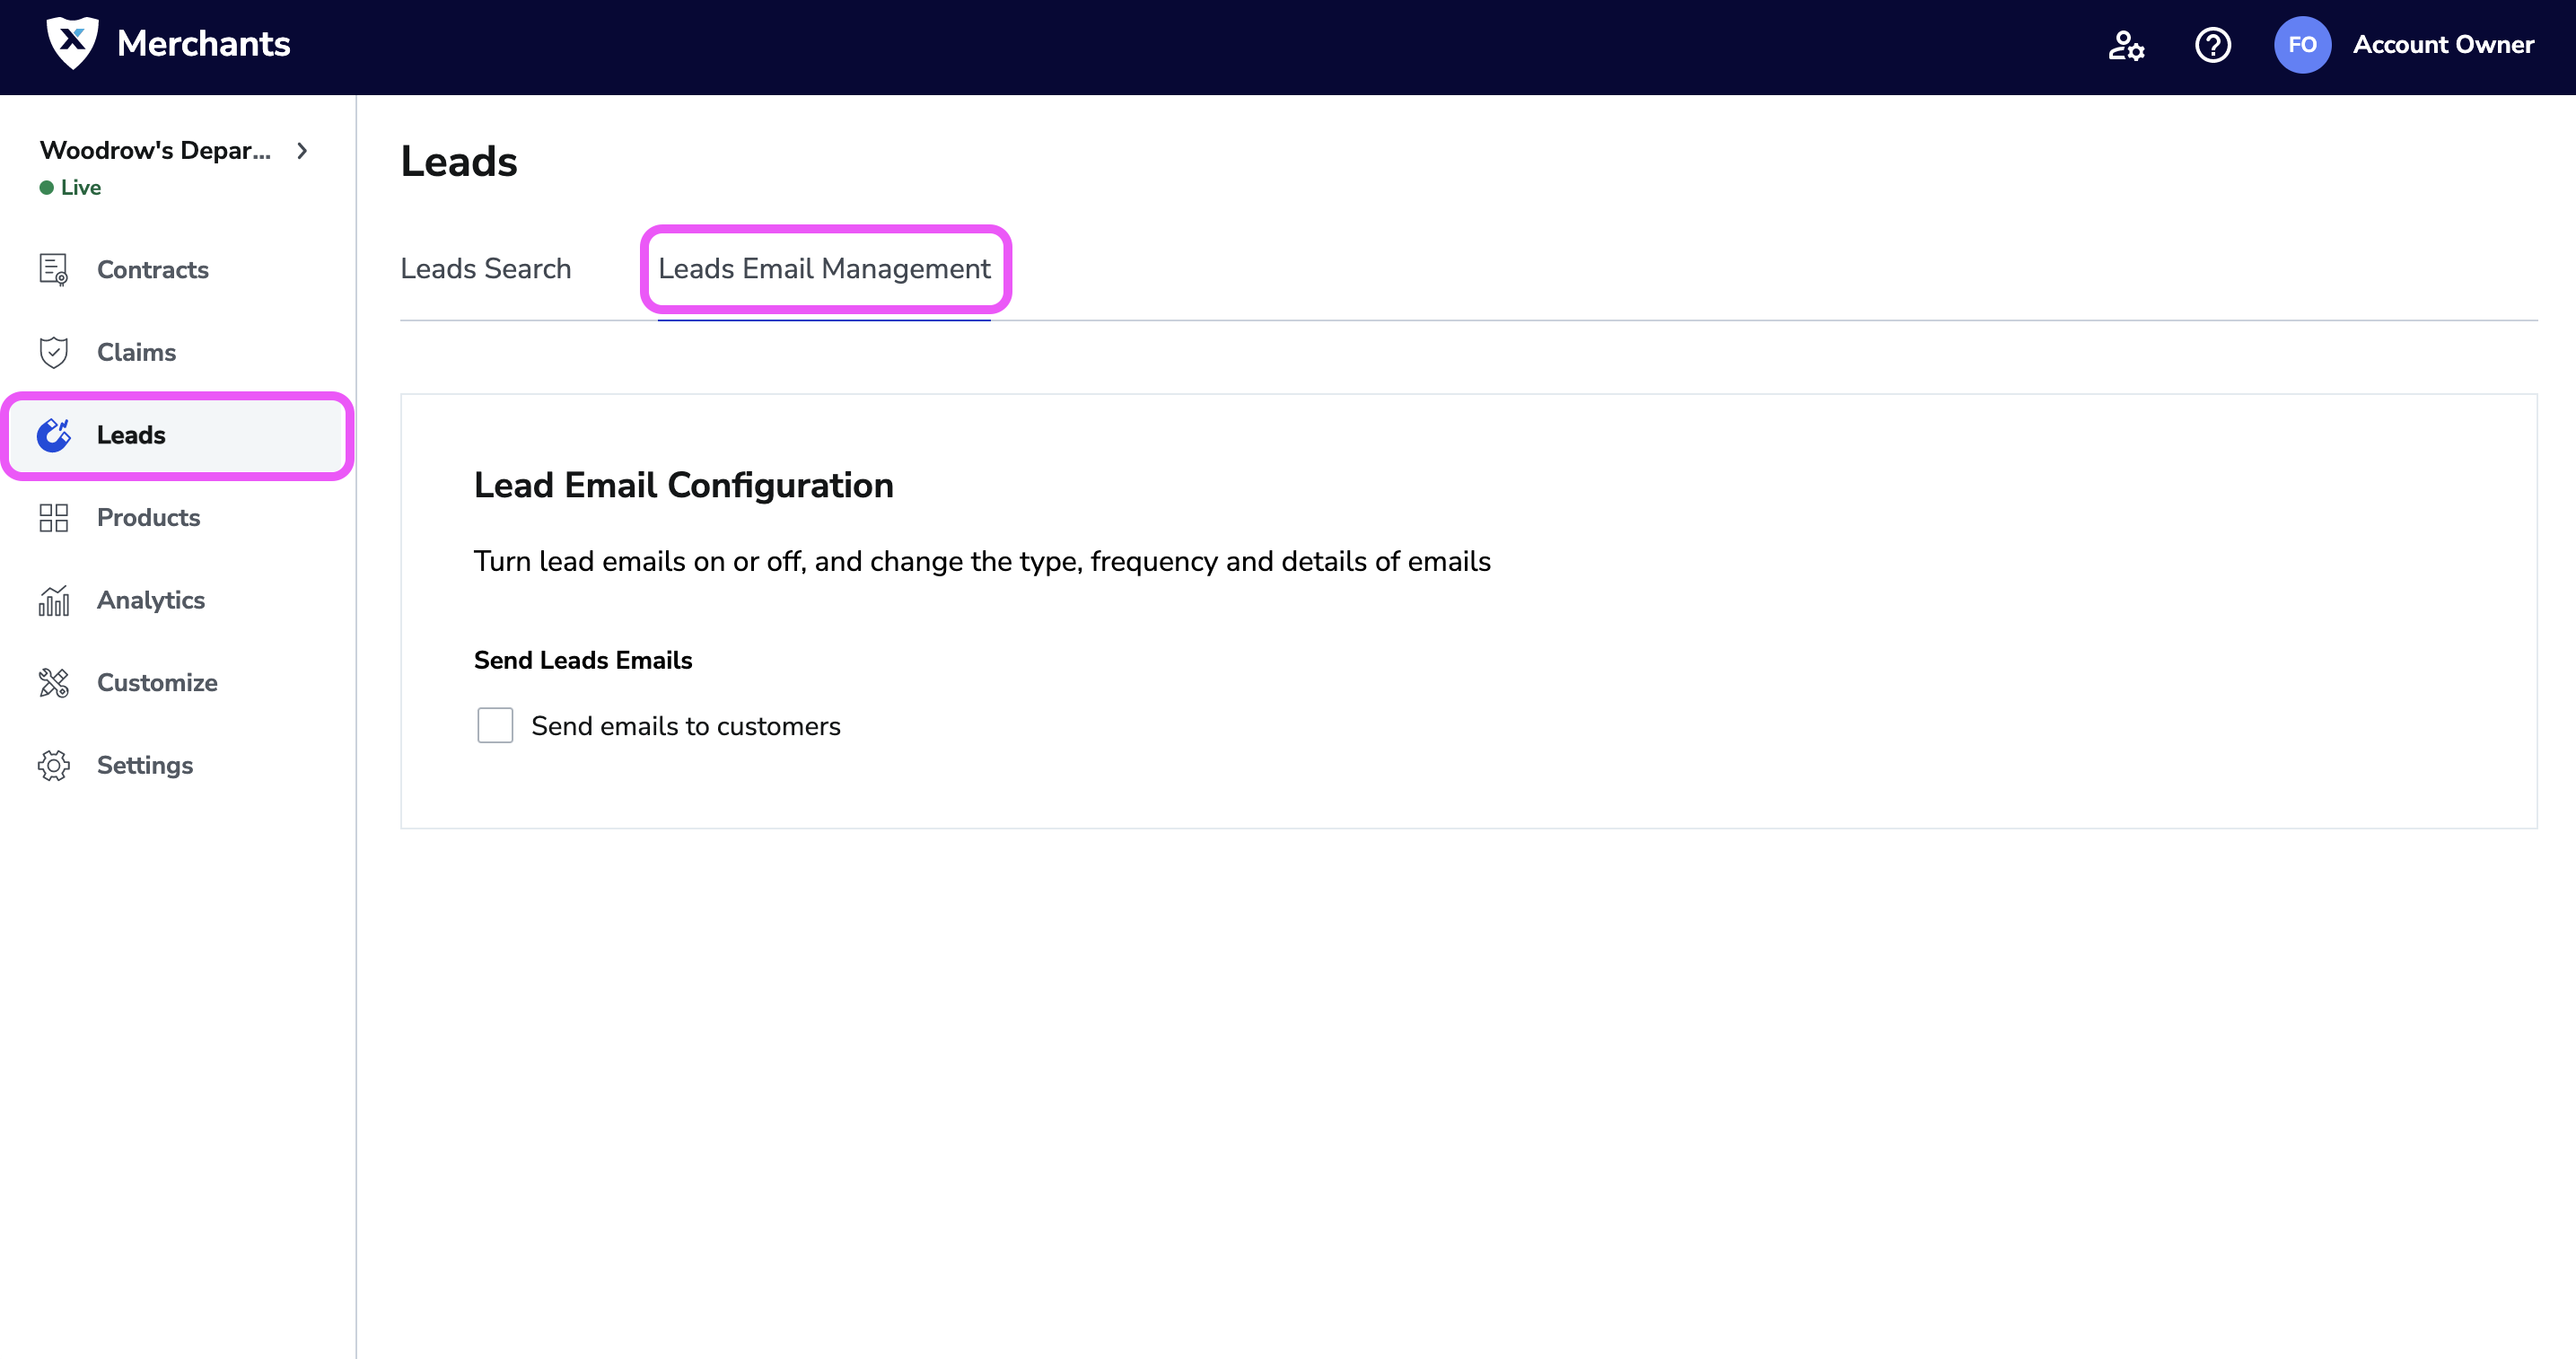
- To turn ON automated Post-Purchase Upsell Emails, check the "Send emails to customers" checkbox
- Click the Save Changes button on the dropdown banner.
To disable your automated Post-Purchase Upsell Emails:
- Log into the Merchant Portal
- Click on the Leads tab
- Click on the Leads Email Management tab
- To turn OFF automated Post-Purchase Upsell Emails, uncheck the "Send emails to customers" checkbox
- Click the Save Changes button on the dropdown banner.
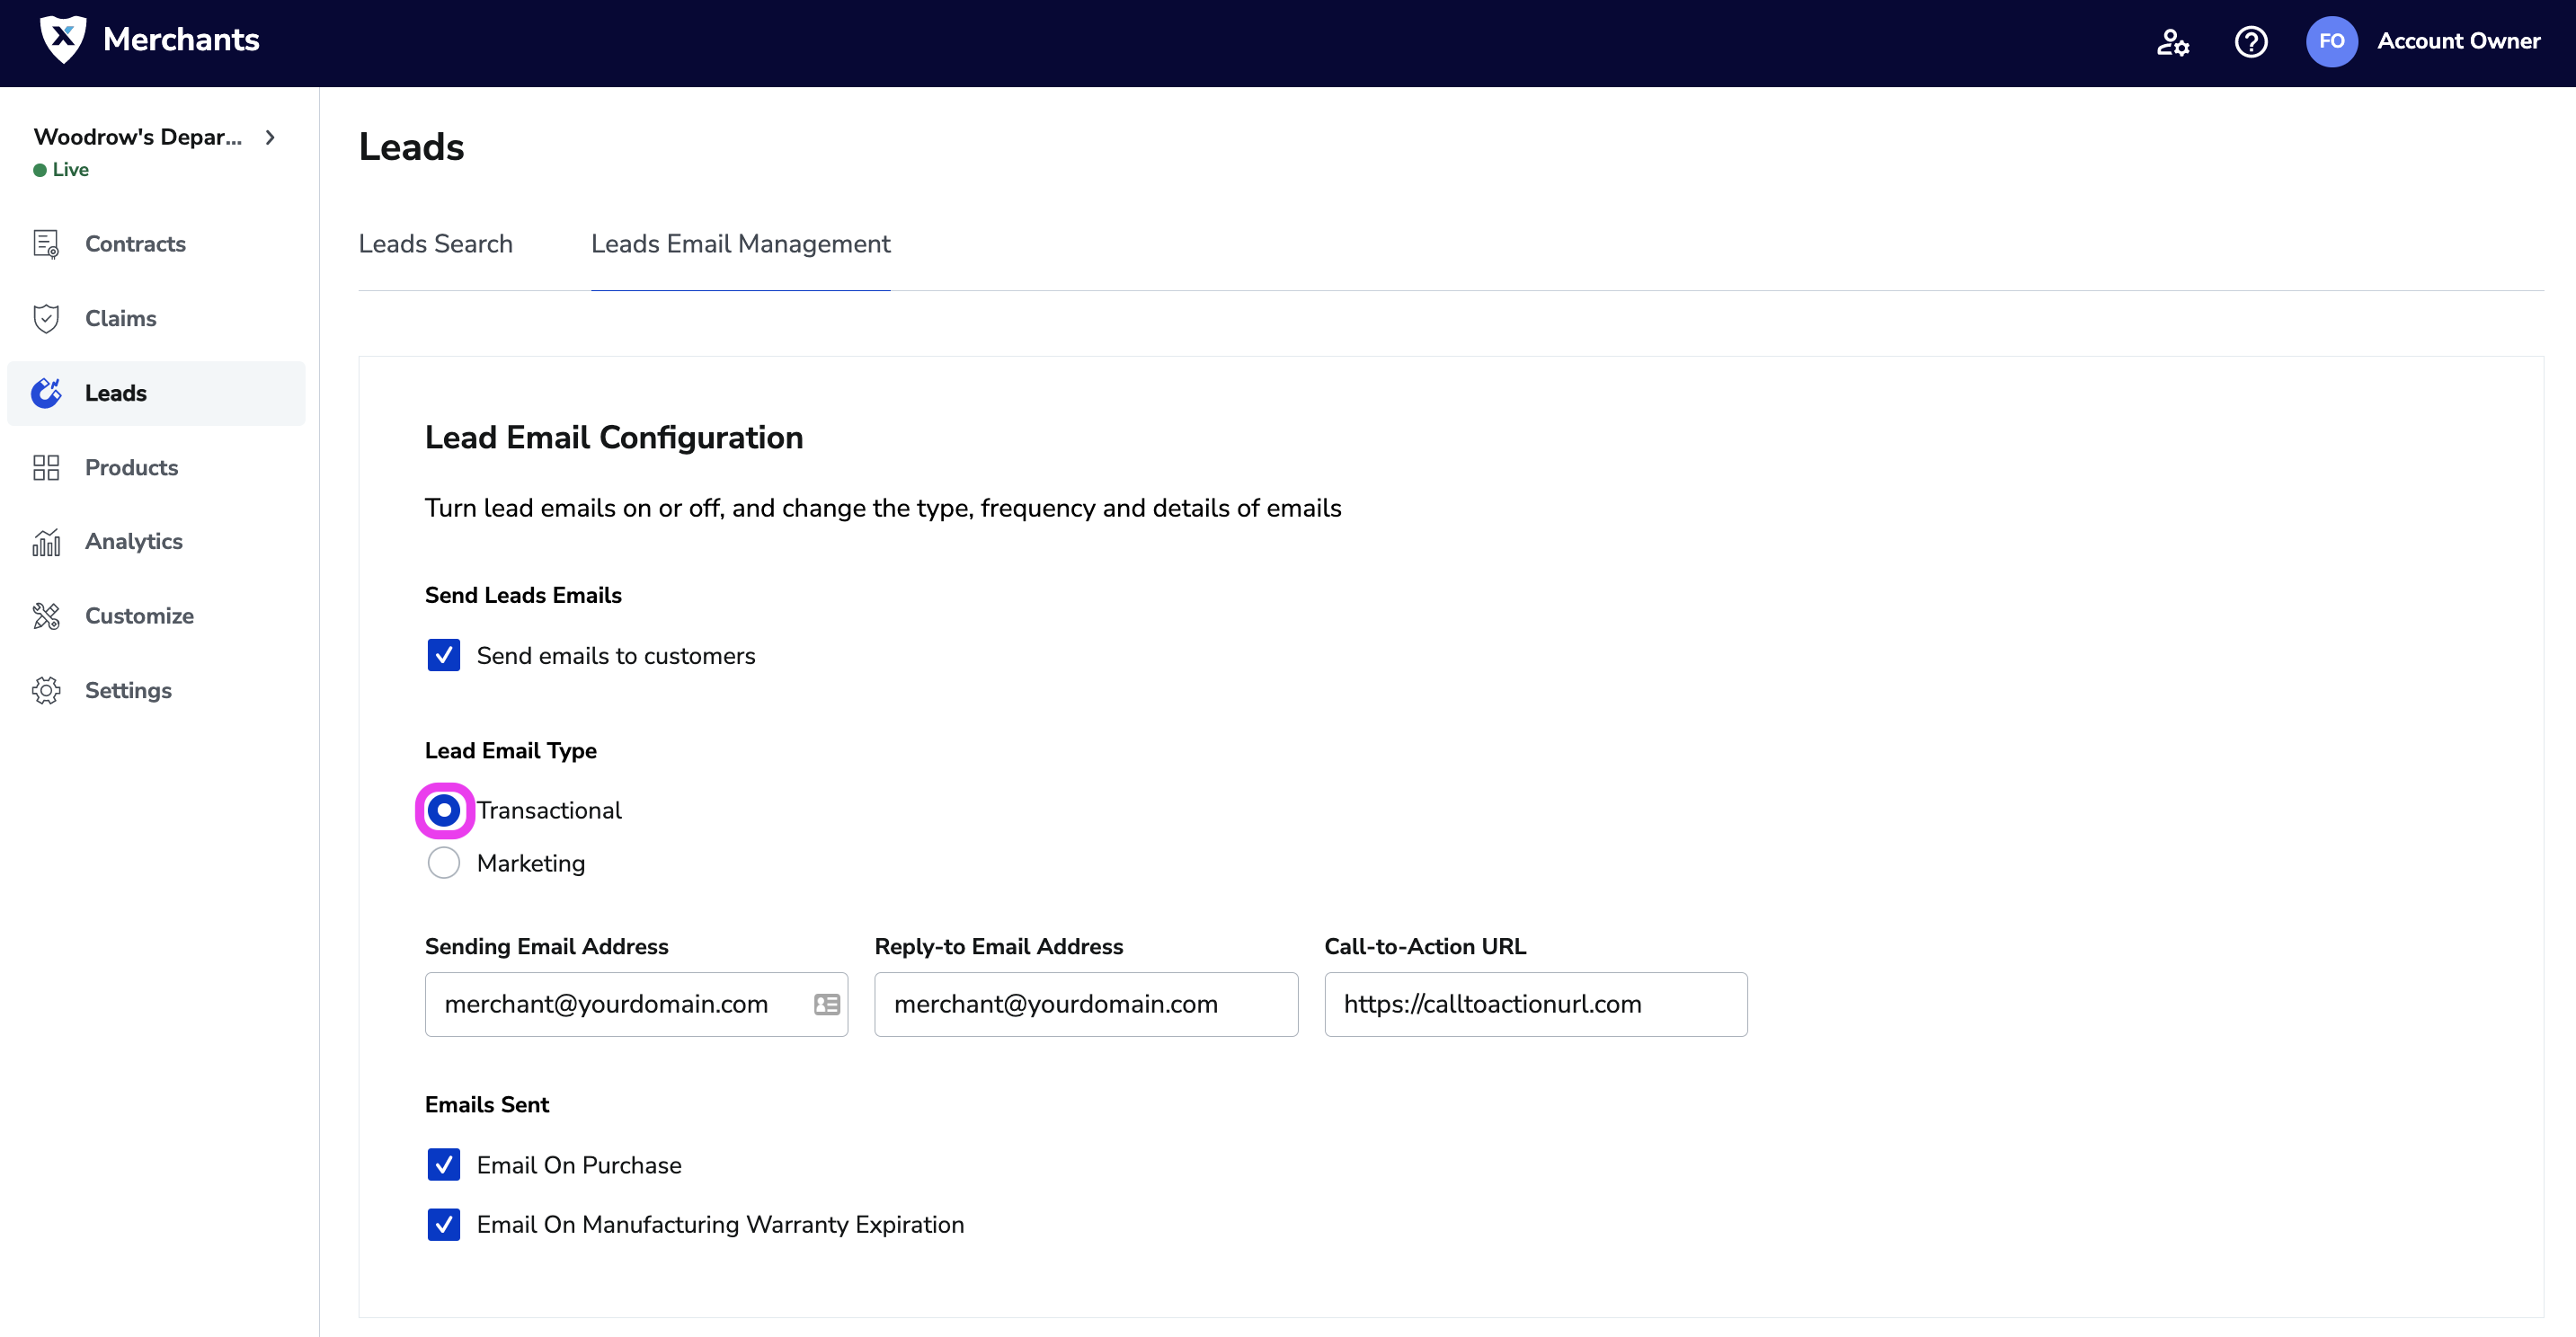
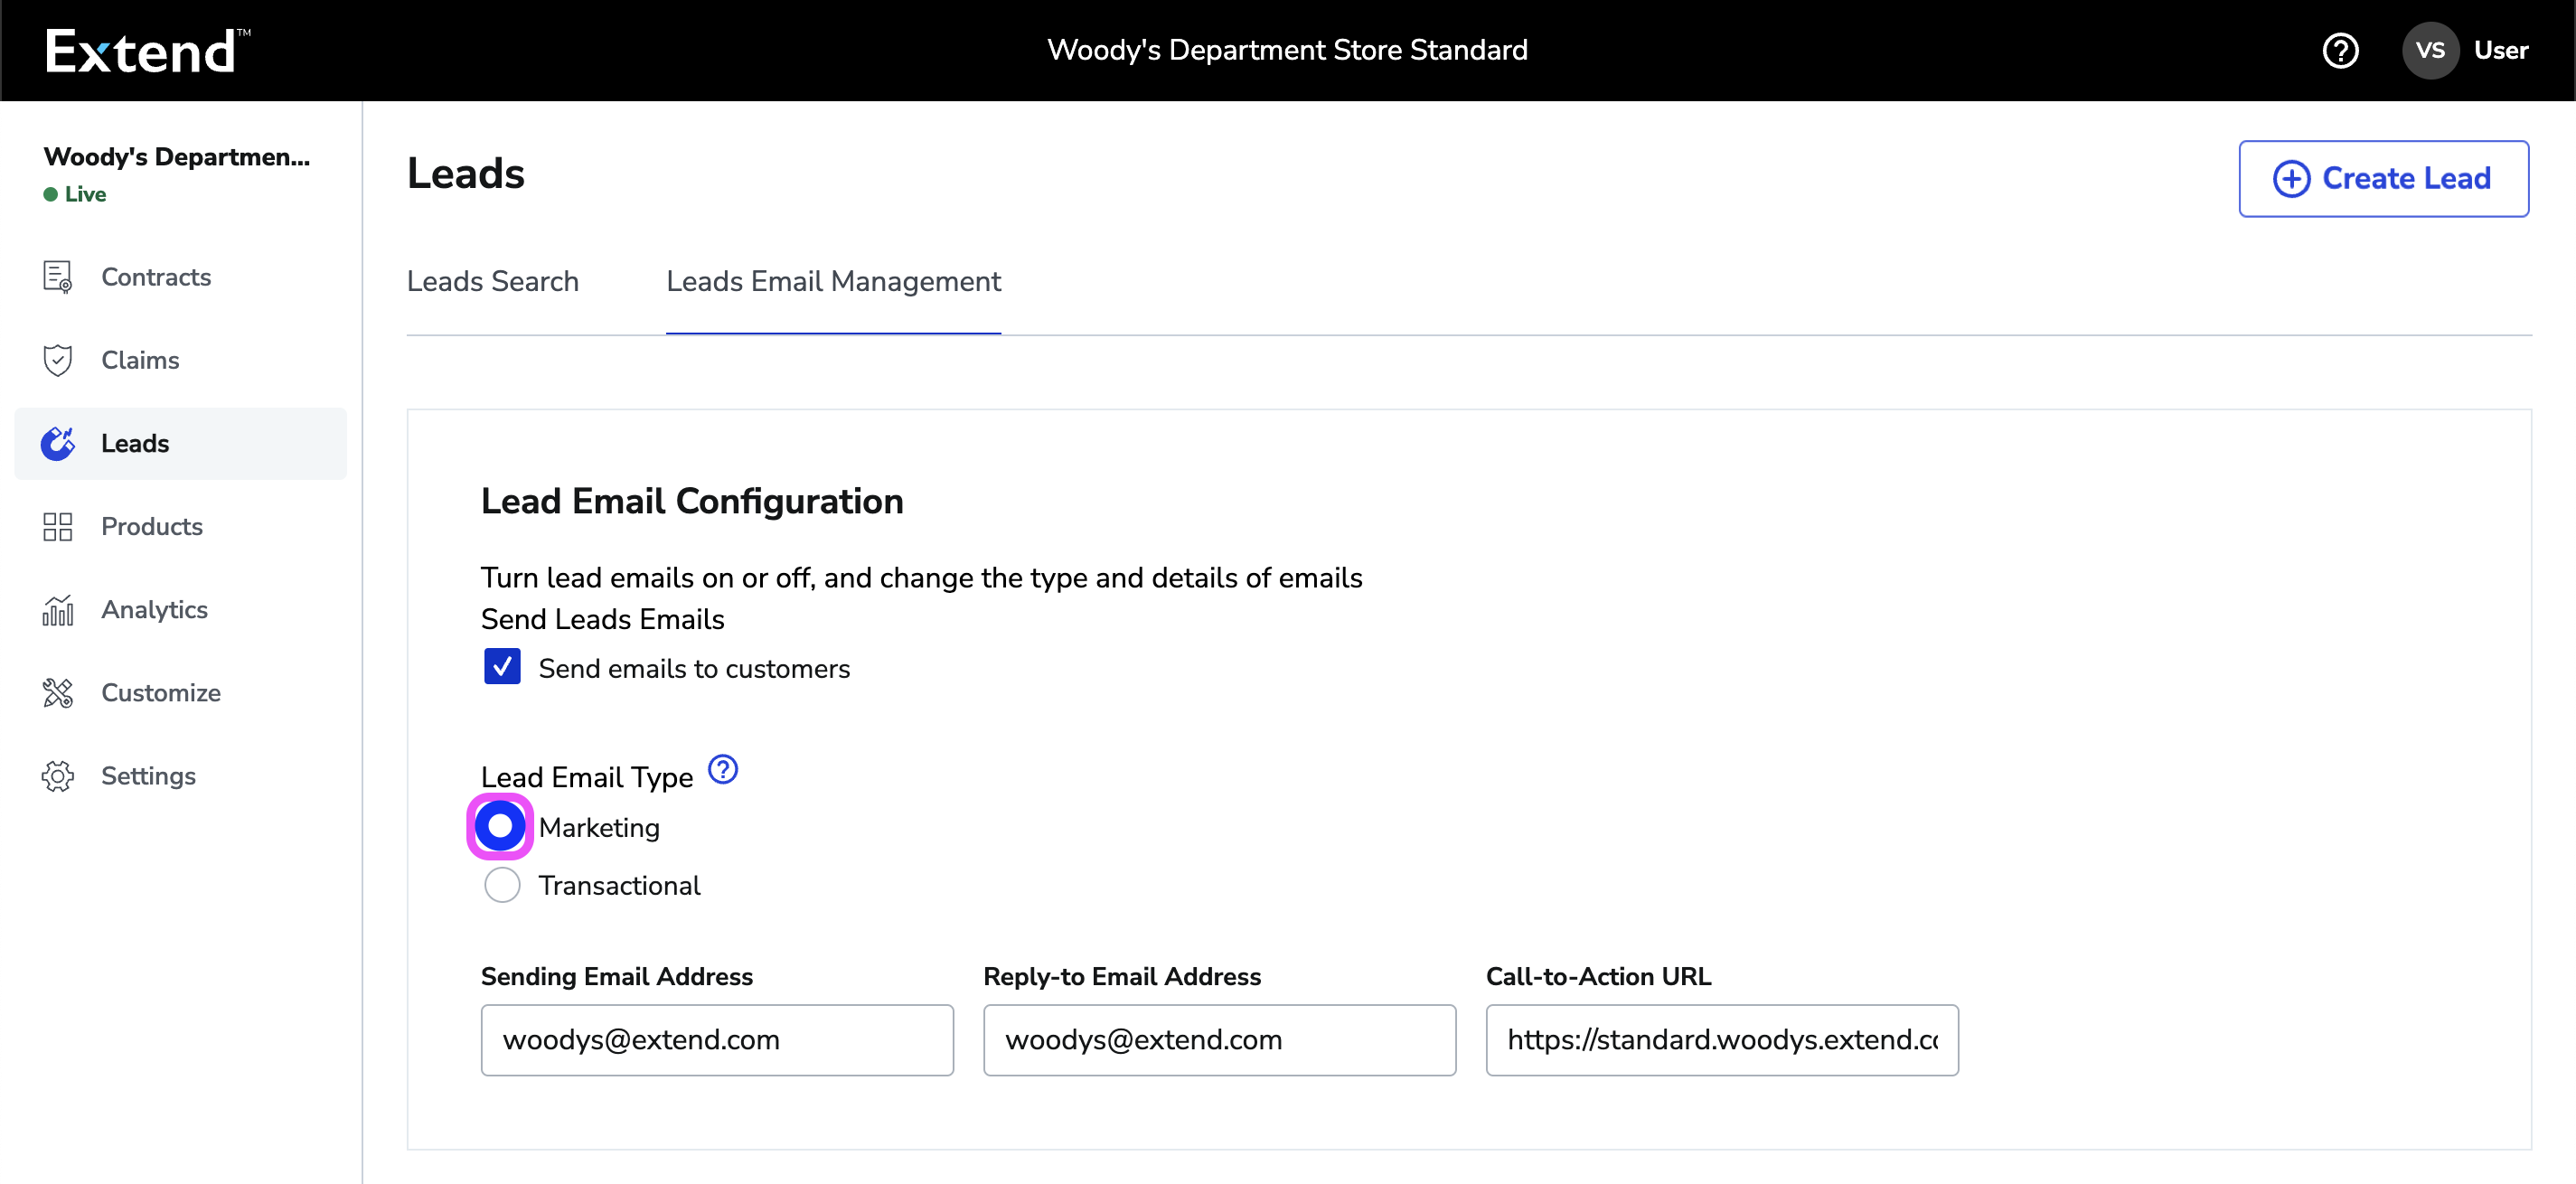
Set and Update your Post-Purchase Upsell Email Type
You can use the Merchant Portal to set and update your Post-Purchase Upsell Email type to be one of the following:
- Transactional - Communications directly relating to a specific transaction, limited to 2 email communications and not subject to US CAN-SPAM regulation.
- Sending Email Address (email address that Post-Purchase Upsell Emails are sent from) is an email address of your choice from your domain e.g. [email protected]
- Connect directly with your customers using your email and branding
- Marketing - Communications not related to a specific transaction, limited to 4 email communications and subject to US CAN-SPAM regulation allowing unsubscription to further messages.
- Sending Email Address (email address that Post-Purchase Upsell Emails are sent from) is an Extend-owned email alias e.g. [email protected]
- Extend sends marketing emails to your customers on your behalf from an Extend-owned domain
NoteThe "Send emails to customers" checkbox must be checked before you can customize your Lead Email Type.
The default selection for Lead Email Type is Transactional.
- Log into the Merchant Portal
- Click on the Leads tab
- Click on the Leads Email Management tab
To update you Lead Email Type to Marketing:
- Log into the Merchant Portal
- Click on the Leads tab
- Click on the Leads Email Management tab
- Under Lead Email Type, select Marketing
NoteFor more information about Transaction and Marketing email types and the associated setup, see Transactional Emails and Marketing Emails
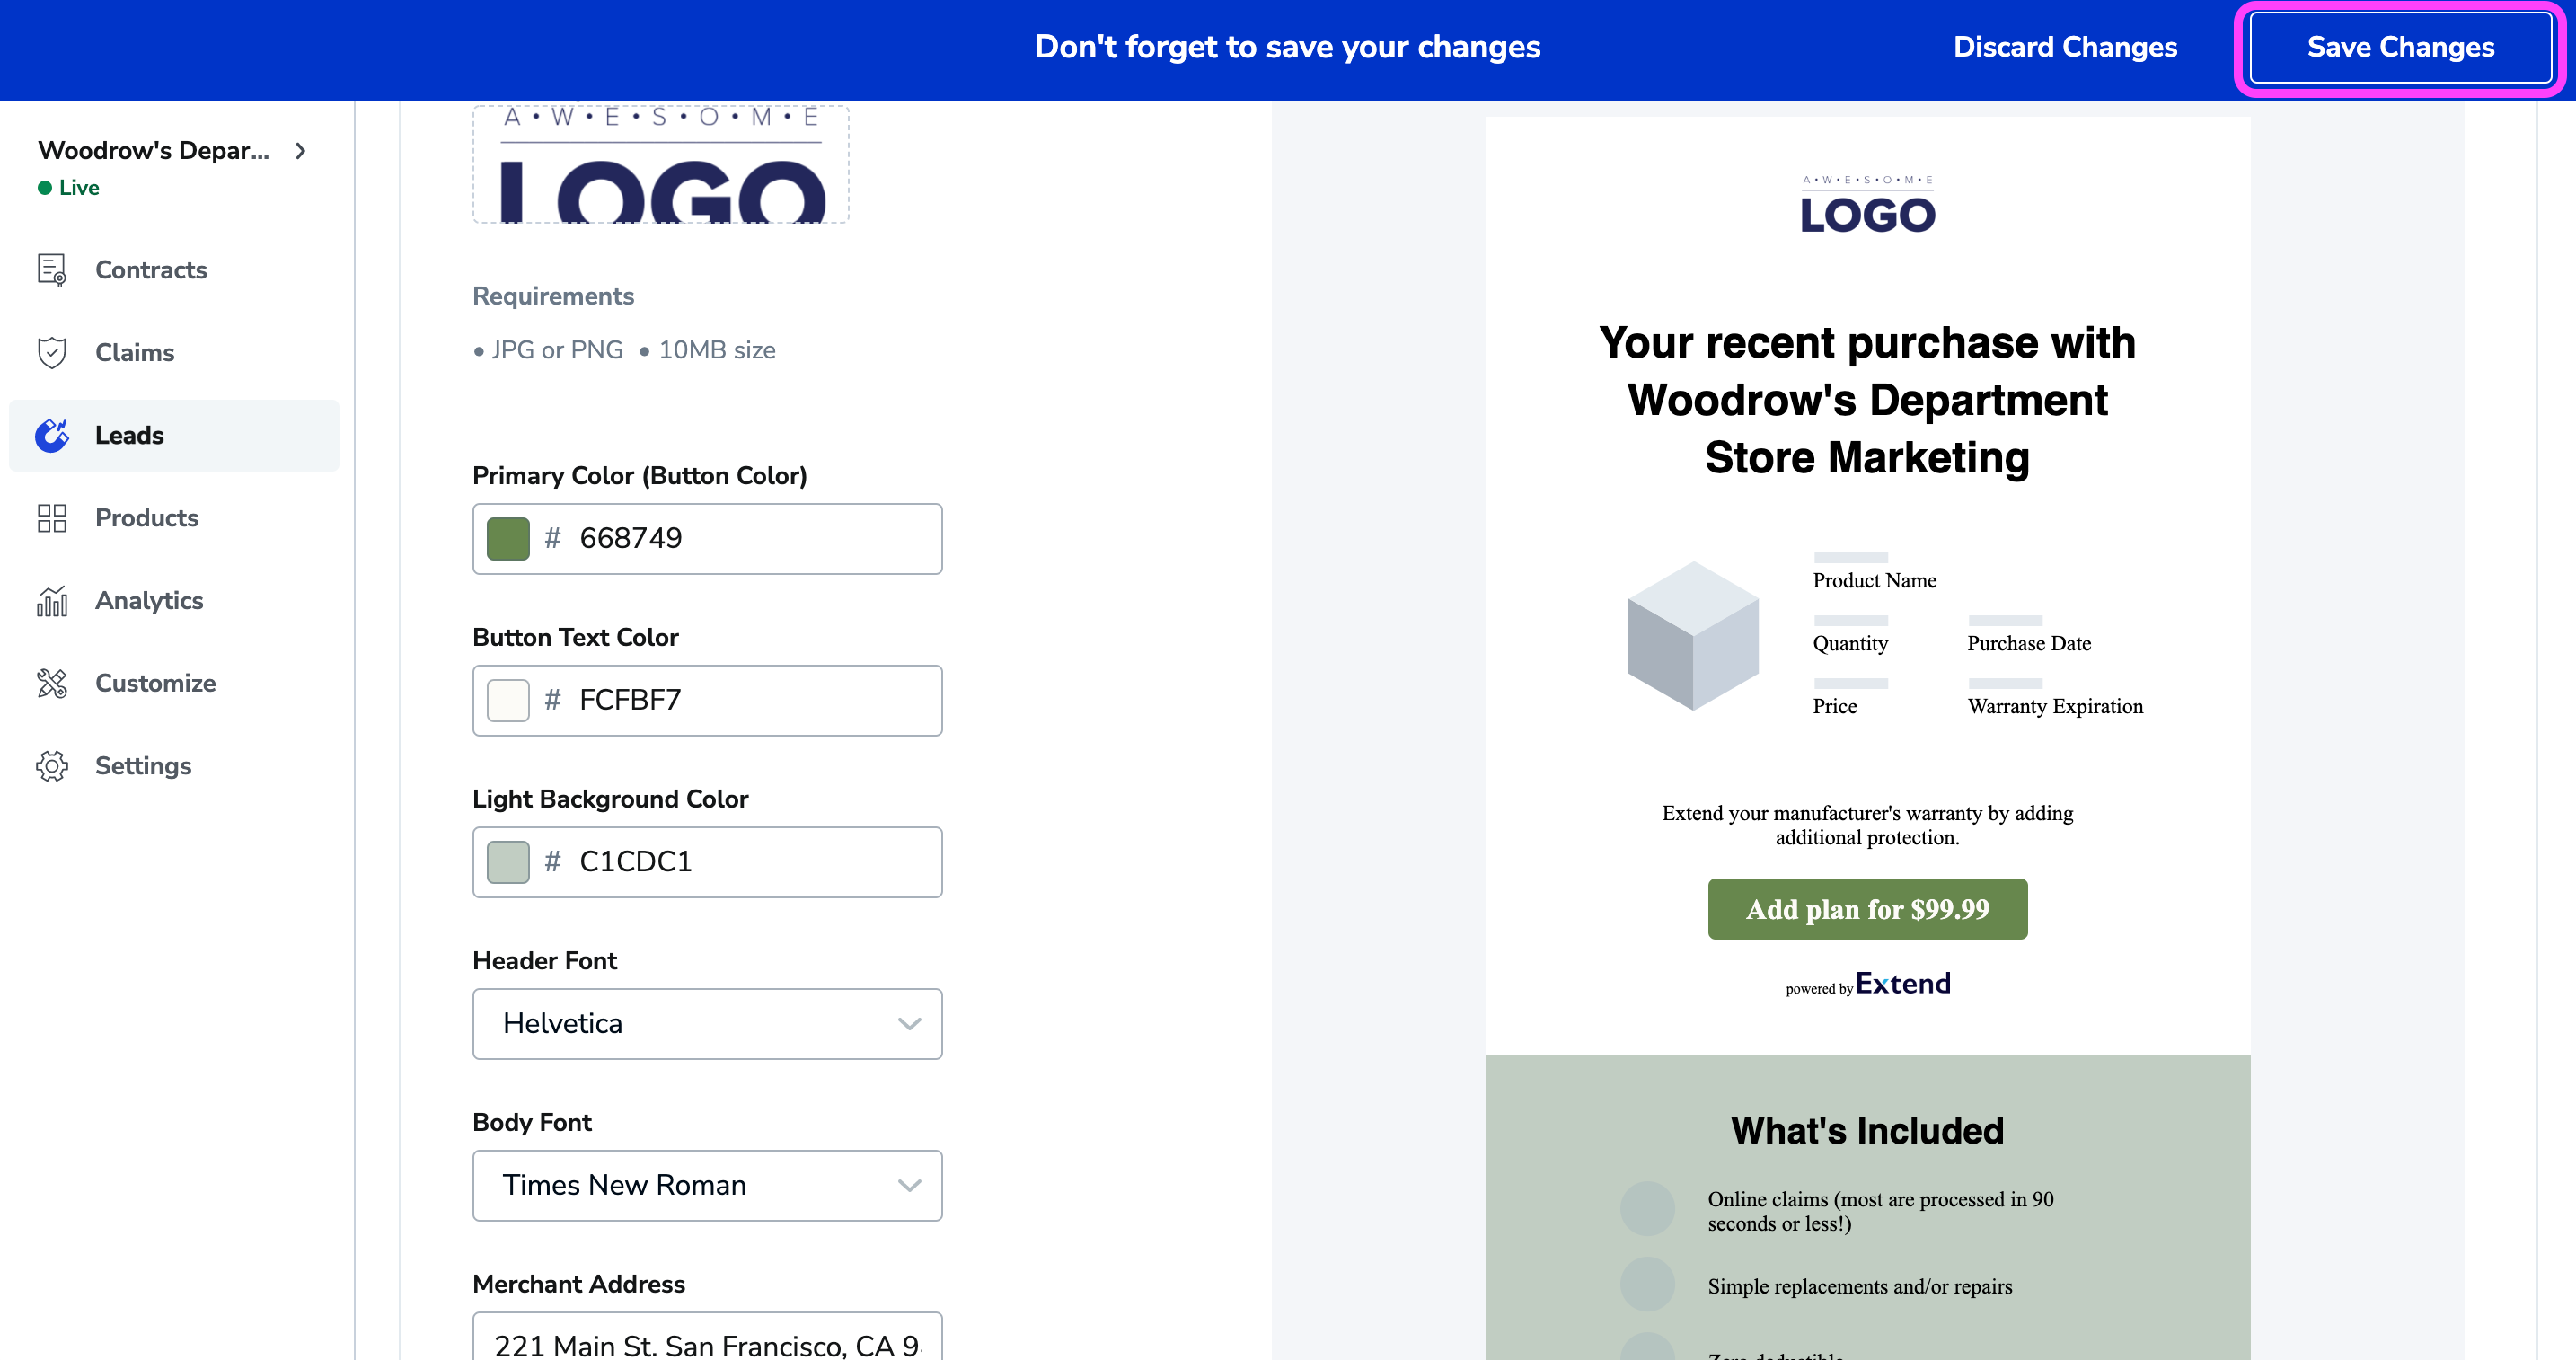
Customize and Preview your Email Logo and Colors
You can use the Merchant Portal to update and preview your Post-Purchase Upsell Email logo and colors. Previewing allows you to see what your email would look like to customers before you officially publish the changes.
The following fields on your Post-Purchase Upsell Email can be customized and previewed live:
- Store Name
- Store Logo (JPG or PNG only, 10MB max file size)
- Primary Color (Button Color)
- Button Text Color
- Light Background Color
- Header Font
- Body Font
- Merchant Address
- Pricacy Policy Link
- Merchant Phone Number
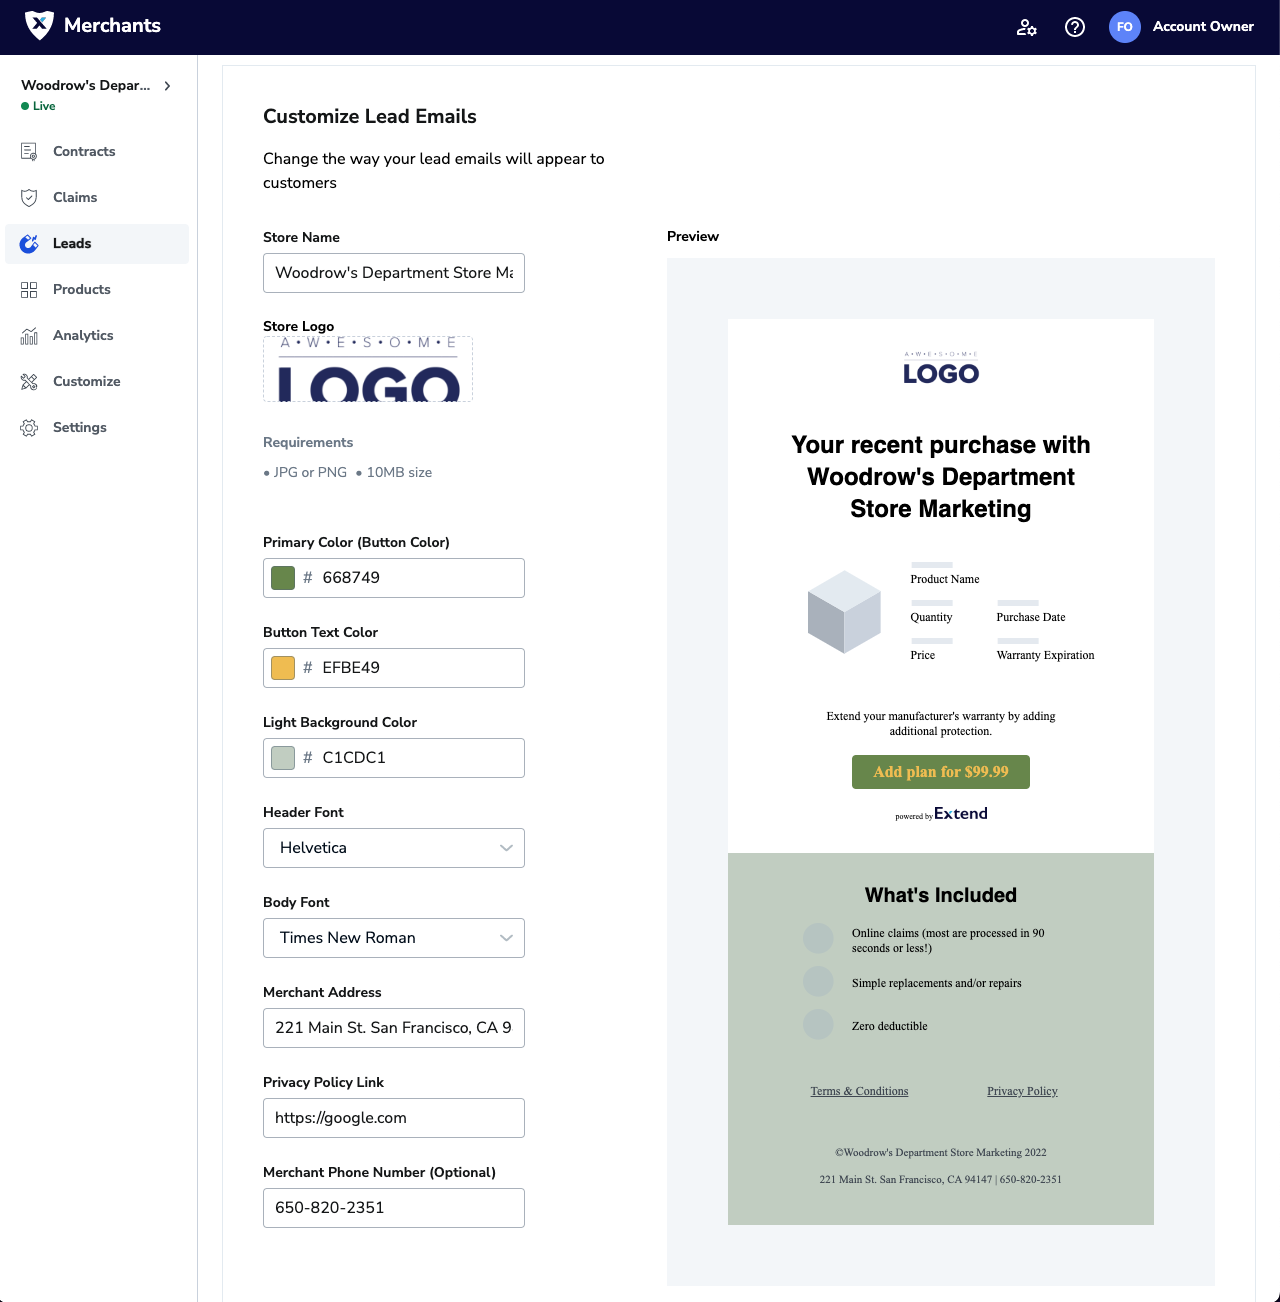
To customize your Lead Emails, simply do the following:
- Log into the Merchant Portal
- Click on the Leads tab
- Click on the Leads Email Management tab
- Scroll down to the Customize Lead Emails section
- Update text / colors on the left hand side and see the updates in realtime in the Preview on the right hand side
- Click Save Changes to change your updates
Trigger Test Emails
You can use the Merchant Portal to trigger test emails of your Post-Purchase Email campaign to be sent to your email address of choice. This allows you to preview the emails that your customers will receive. Triggering test emails will send you the series of emails that your customer will receive, specific to Transactional or Marketing email type.
To trigger test Post-Purchase Emails:
- Log into the Merchant Portal
- Click on the Leads tab
- Click on the Leads Email Management tab
- Scroll down to the Send Test Emails section
- Input the email address you want the test emails to be seent to
- Click the Send Test Email(s) button
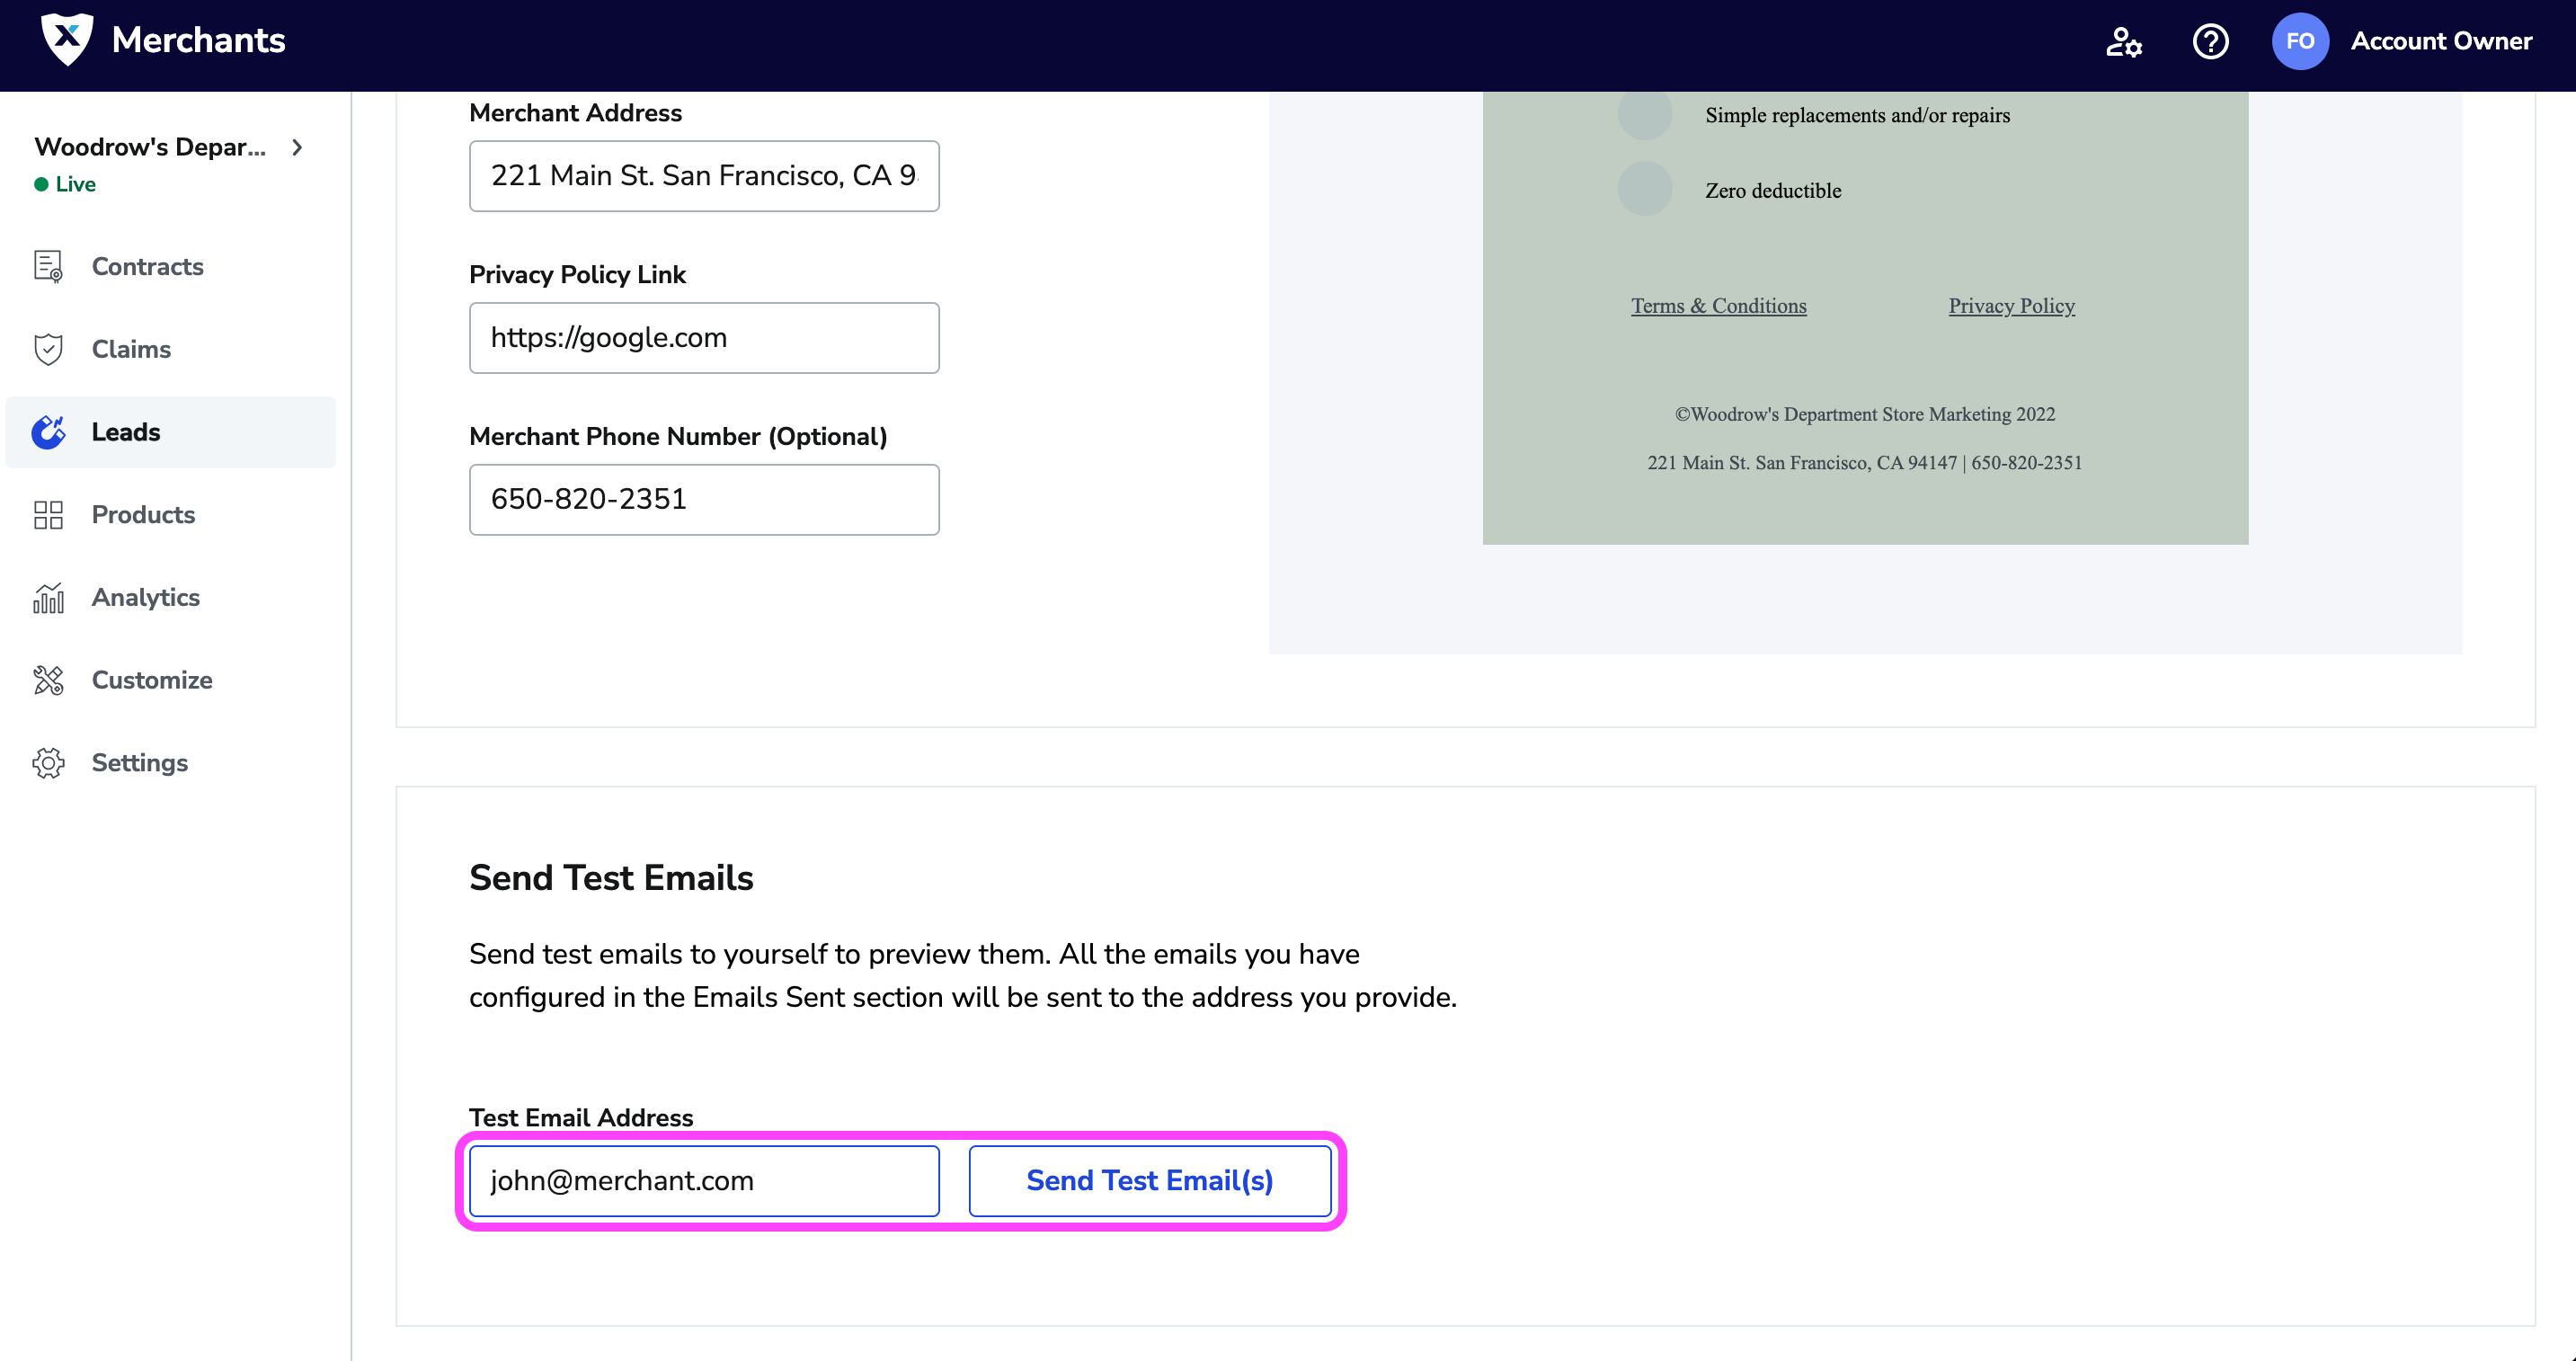
Within a minute or two, you should receive Post-Purchase Upsell email(s) based on the Email Type and Email Triggers selected in the Lead Email Configuration section.
Export Leads List to CSV
Leads ExportFor Leads Export, please refer to this article Exporting Leads
Import Leads CSV to Excel
If you want to import your Leads CSV file into an Excel file, we recommend taking the following steps to ensure your data is not manipulated during the import process:
- Open Excel or Google Sheets
- Click on File -> Import

- Click the Upload tab
- Drag in your Leads CSV file or click the Select a file from your device button and select the Leads CSV file

- Uncheck the checkbox beside "Convert text to numbers, dates, and formulas"
- Click the Import Data button

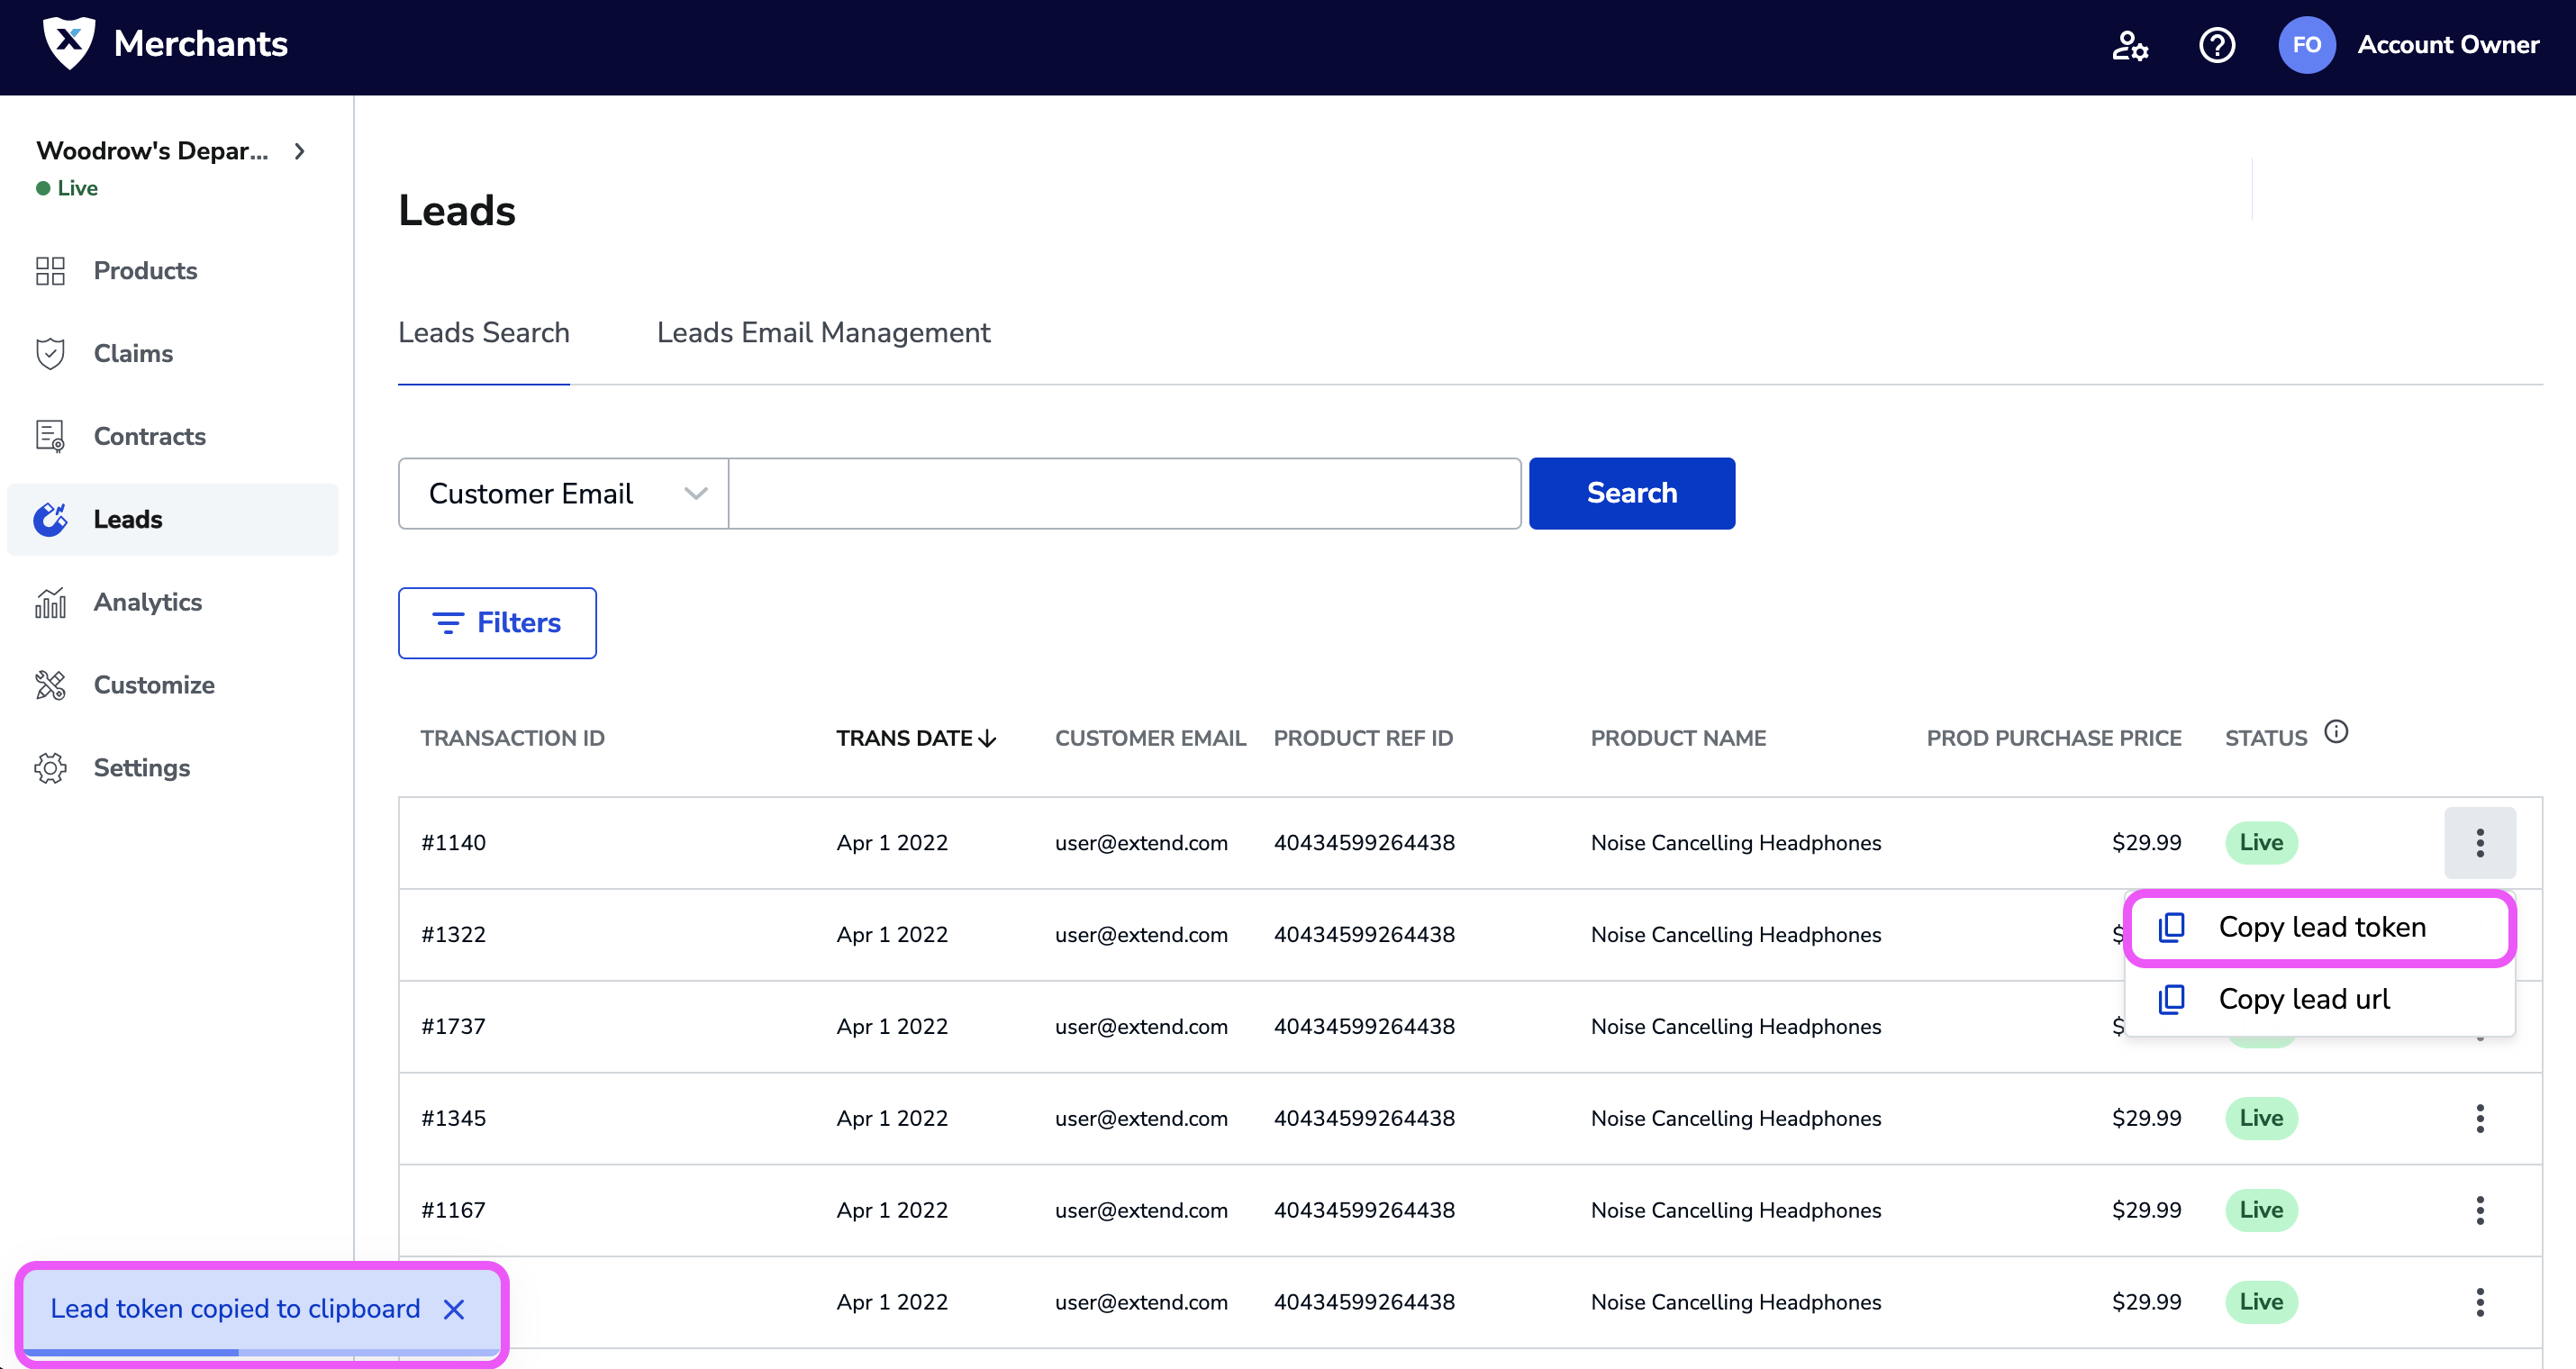
Copy Lead Token
You can use the Merchant Portal to manually copy a lead token for any lead that your integration has generated. The lead token can be used to manually create a lead URL that can be sent to customers for one-off post-purchase offers.
Copy Lead Token from List View
- Log into the Merchant Portal
- On the left navigation bar, click on Leads
- Search or filter to find a specific lead
- From the list view, click the three dots and select Copy Lead Token
Copy Lead Token from Lead Detail View
- Log into the Merchant Portal
- On the left navigation bar, click on Leads
- Search or filter to find a specific lead
- Click on the lead in the list view
- From the lead detail view, click the Copy Lead Token button
When the lead URL has been successfully copied, you will see a message letting you know that the lead URL was successfully copied to your clipboard.

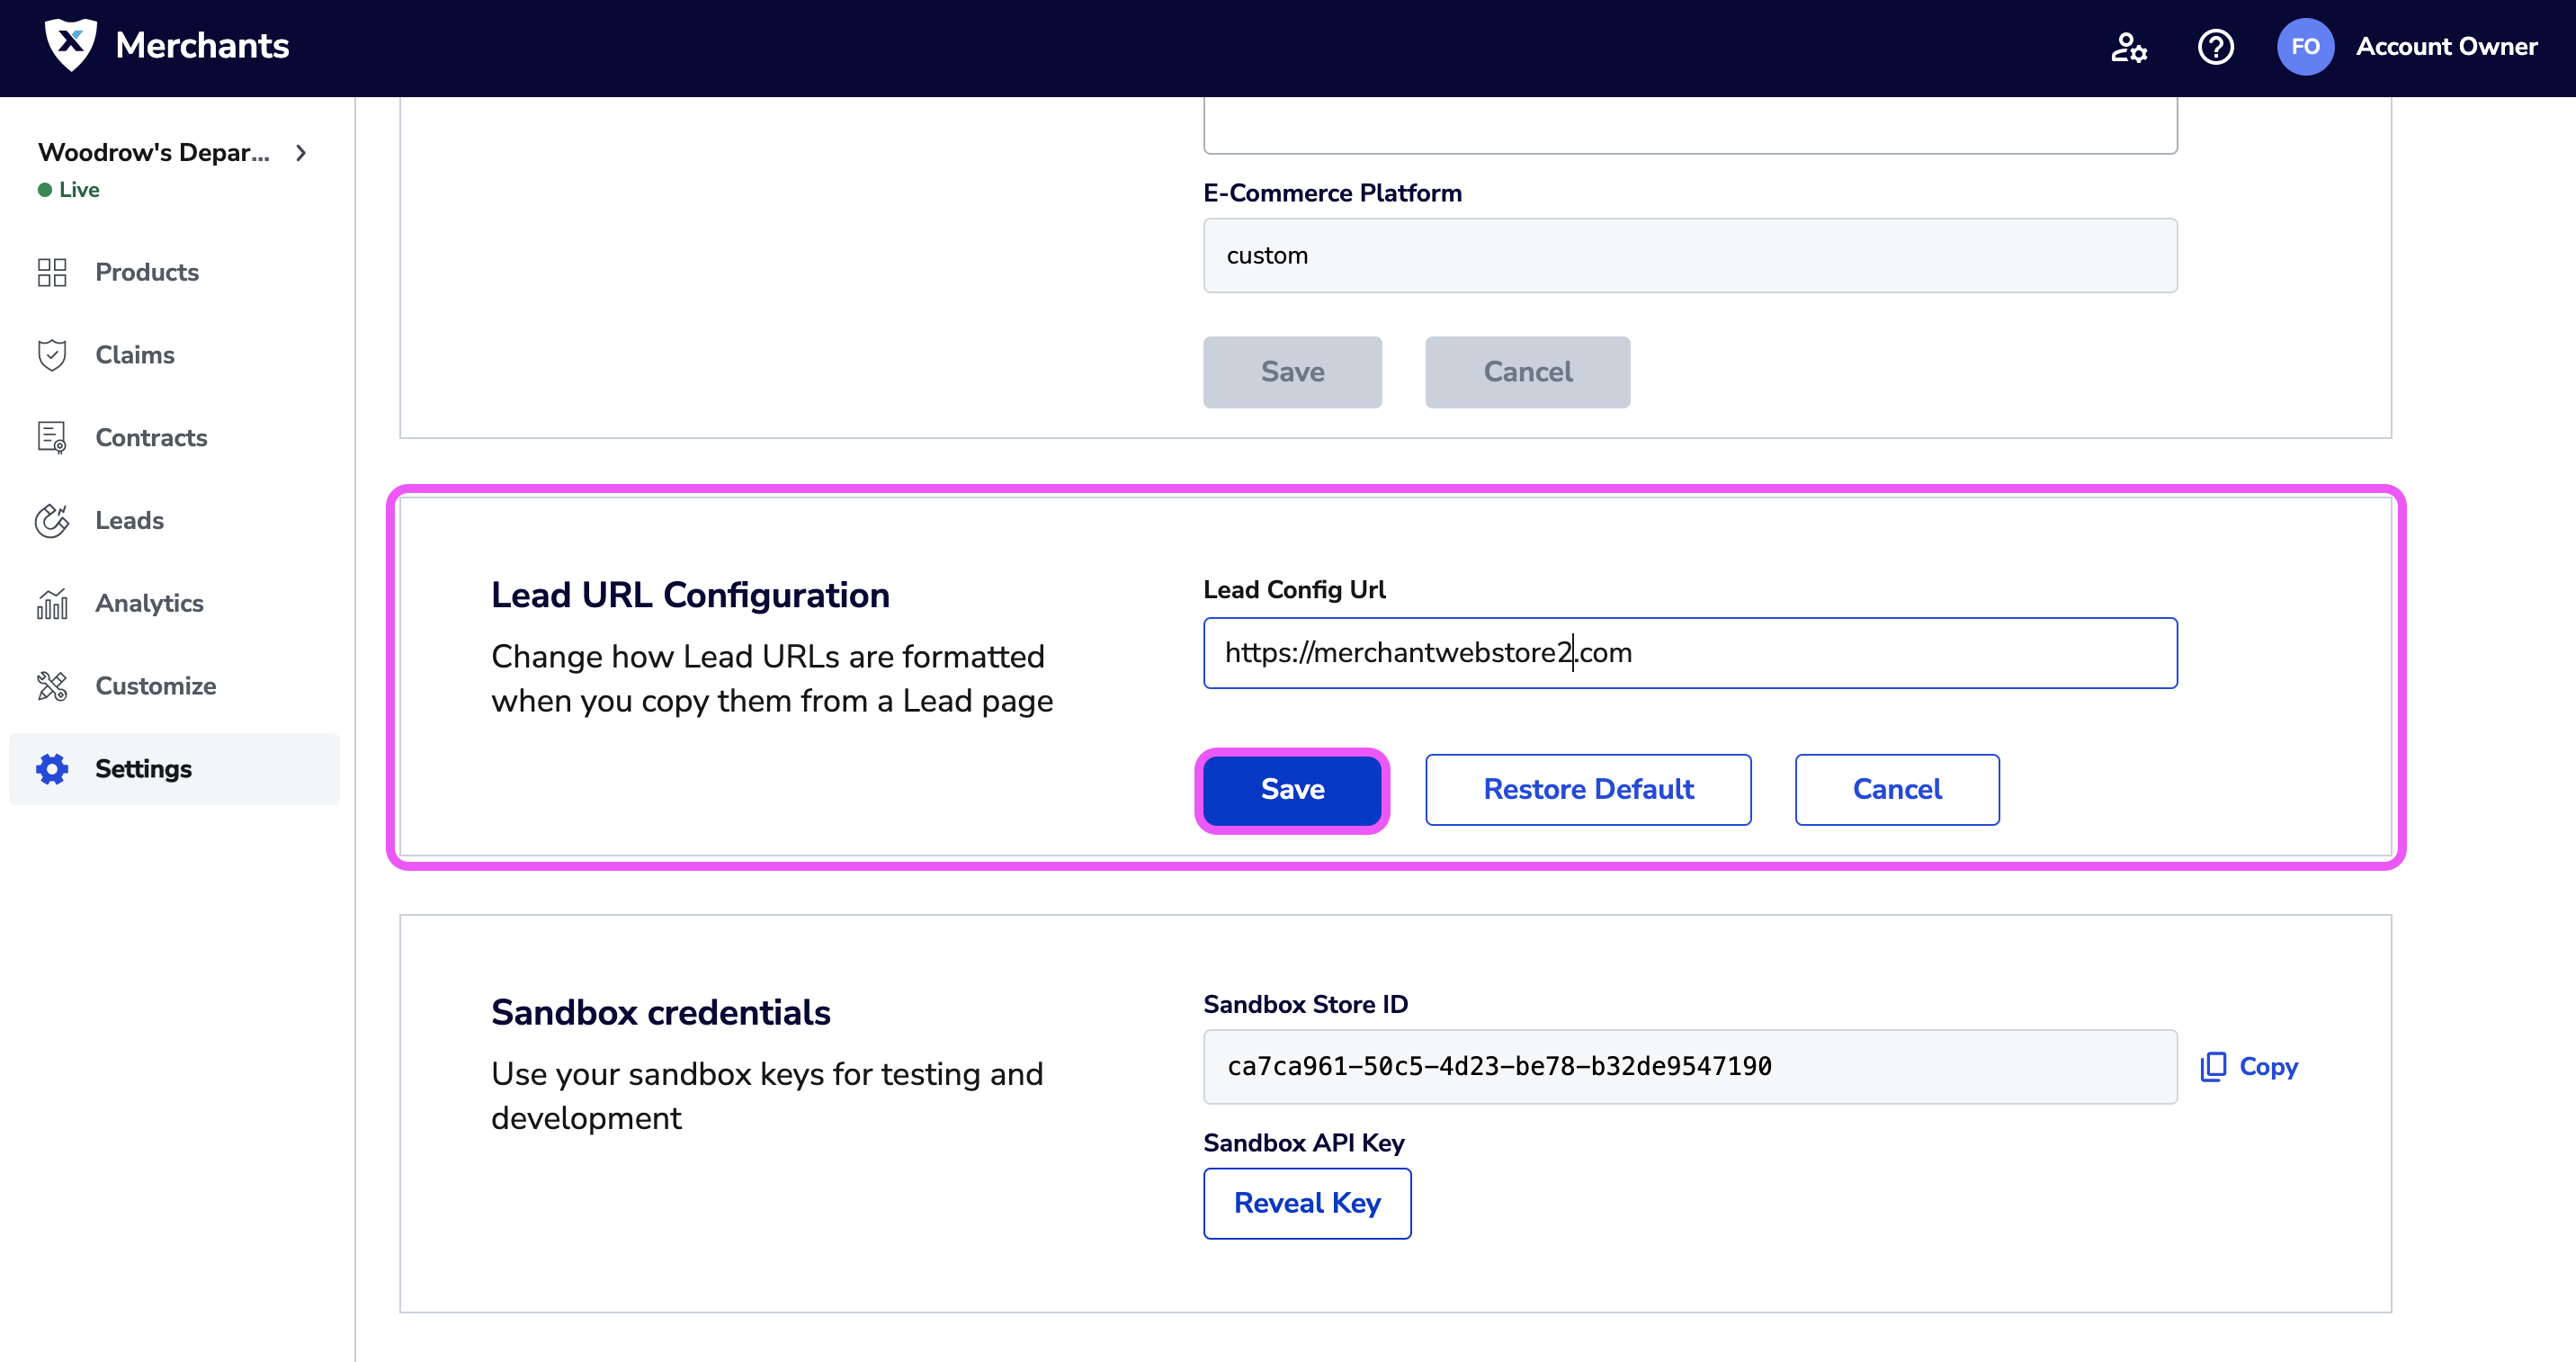
Copy Lead URL
This feature needs to be enabled by your MSMThe Copy Lead URL functionality needs to be enabled by your MSM. Please contact your MSM and provide your default Base URL. This is typically the URL of your store where customers can convert (purchase) an Extend Lead. You will not see the Copy lead url button in the Merchant Portal until the Base URL is configured and the feature is enabled.
To avoid the step of manually constructing a Lead URL for your post-purchase email using a base URL and Lead Token, you can use the Copy Lead URL functionality to get a pre-constructed link that can be sent directly to your customer.
A Lead URL is the combination of your specified Base URL and your Lead Token:
Lead URL Structure: {Base URL}?leadToken={Lead Token}
Example: https://merchantwebstore.com?leadToken=febdc18a0409ee883e5f64a7842d74dc
Update your Base URL
- Log into the Merchant Portal
- On the left navigation bar, click on Settings
- Navigate to the Lead URL Configuration section
- Enter a new Base URL and click the Save button
NoteThe URL that is saved in the Lead URL Configuration section is the URL that your customer will be directed to when they click the link. This URL can be updated any time.
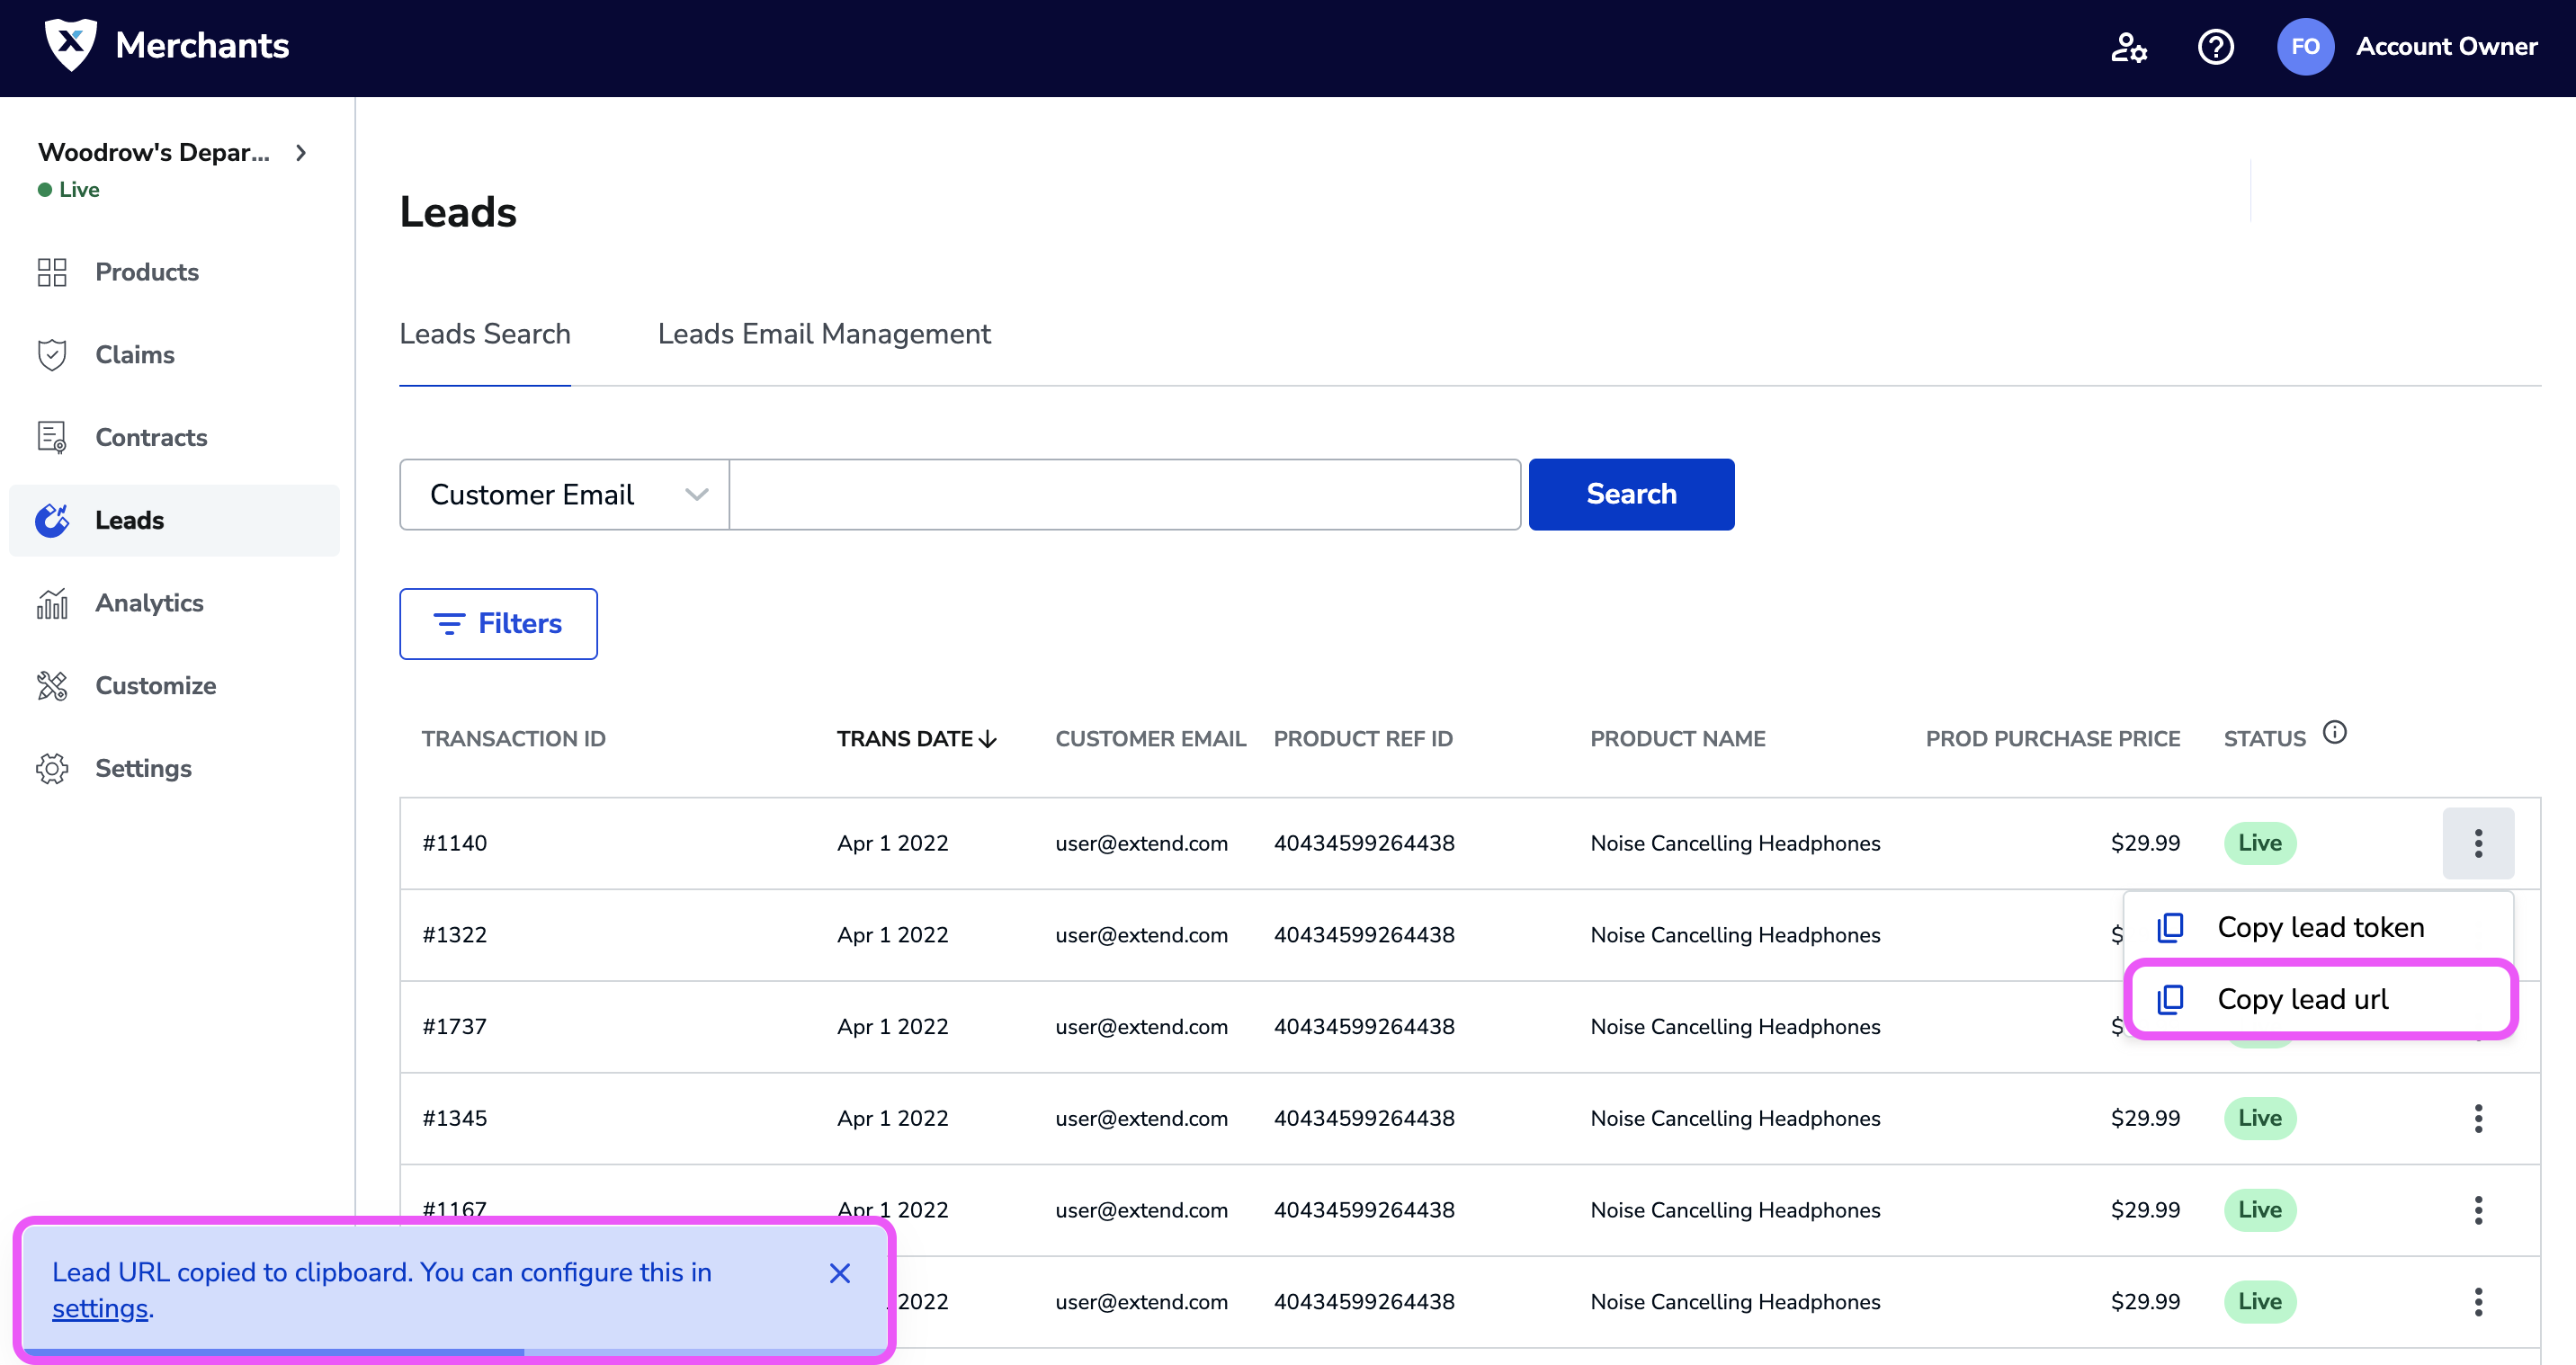
Copy Lead URL from List View
- Log into the Merchant Portal
- On the left navigation bar, click on Leads
- From the list view, click the three dots and select Copy Lead URL
When the lead URL has been successfully copied, you will see a message letting you know that the lead URL was successfully copied to your clipboard.
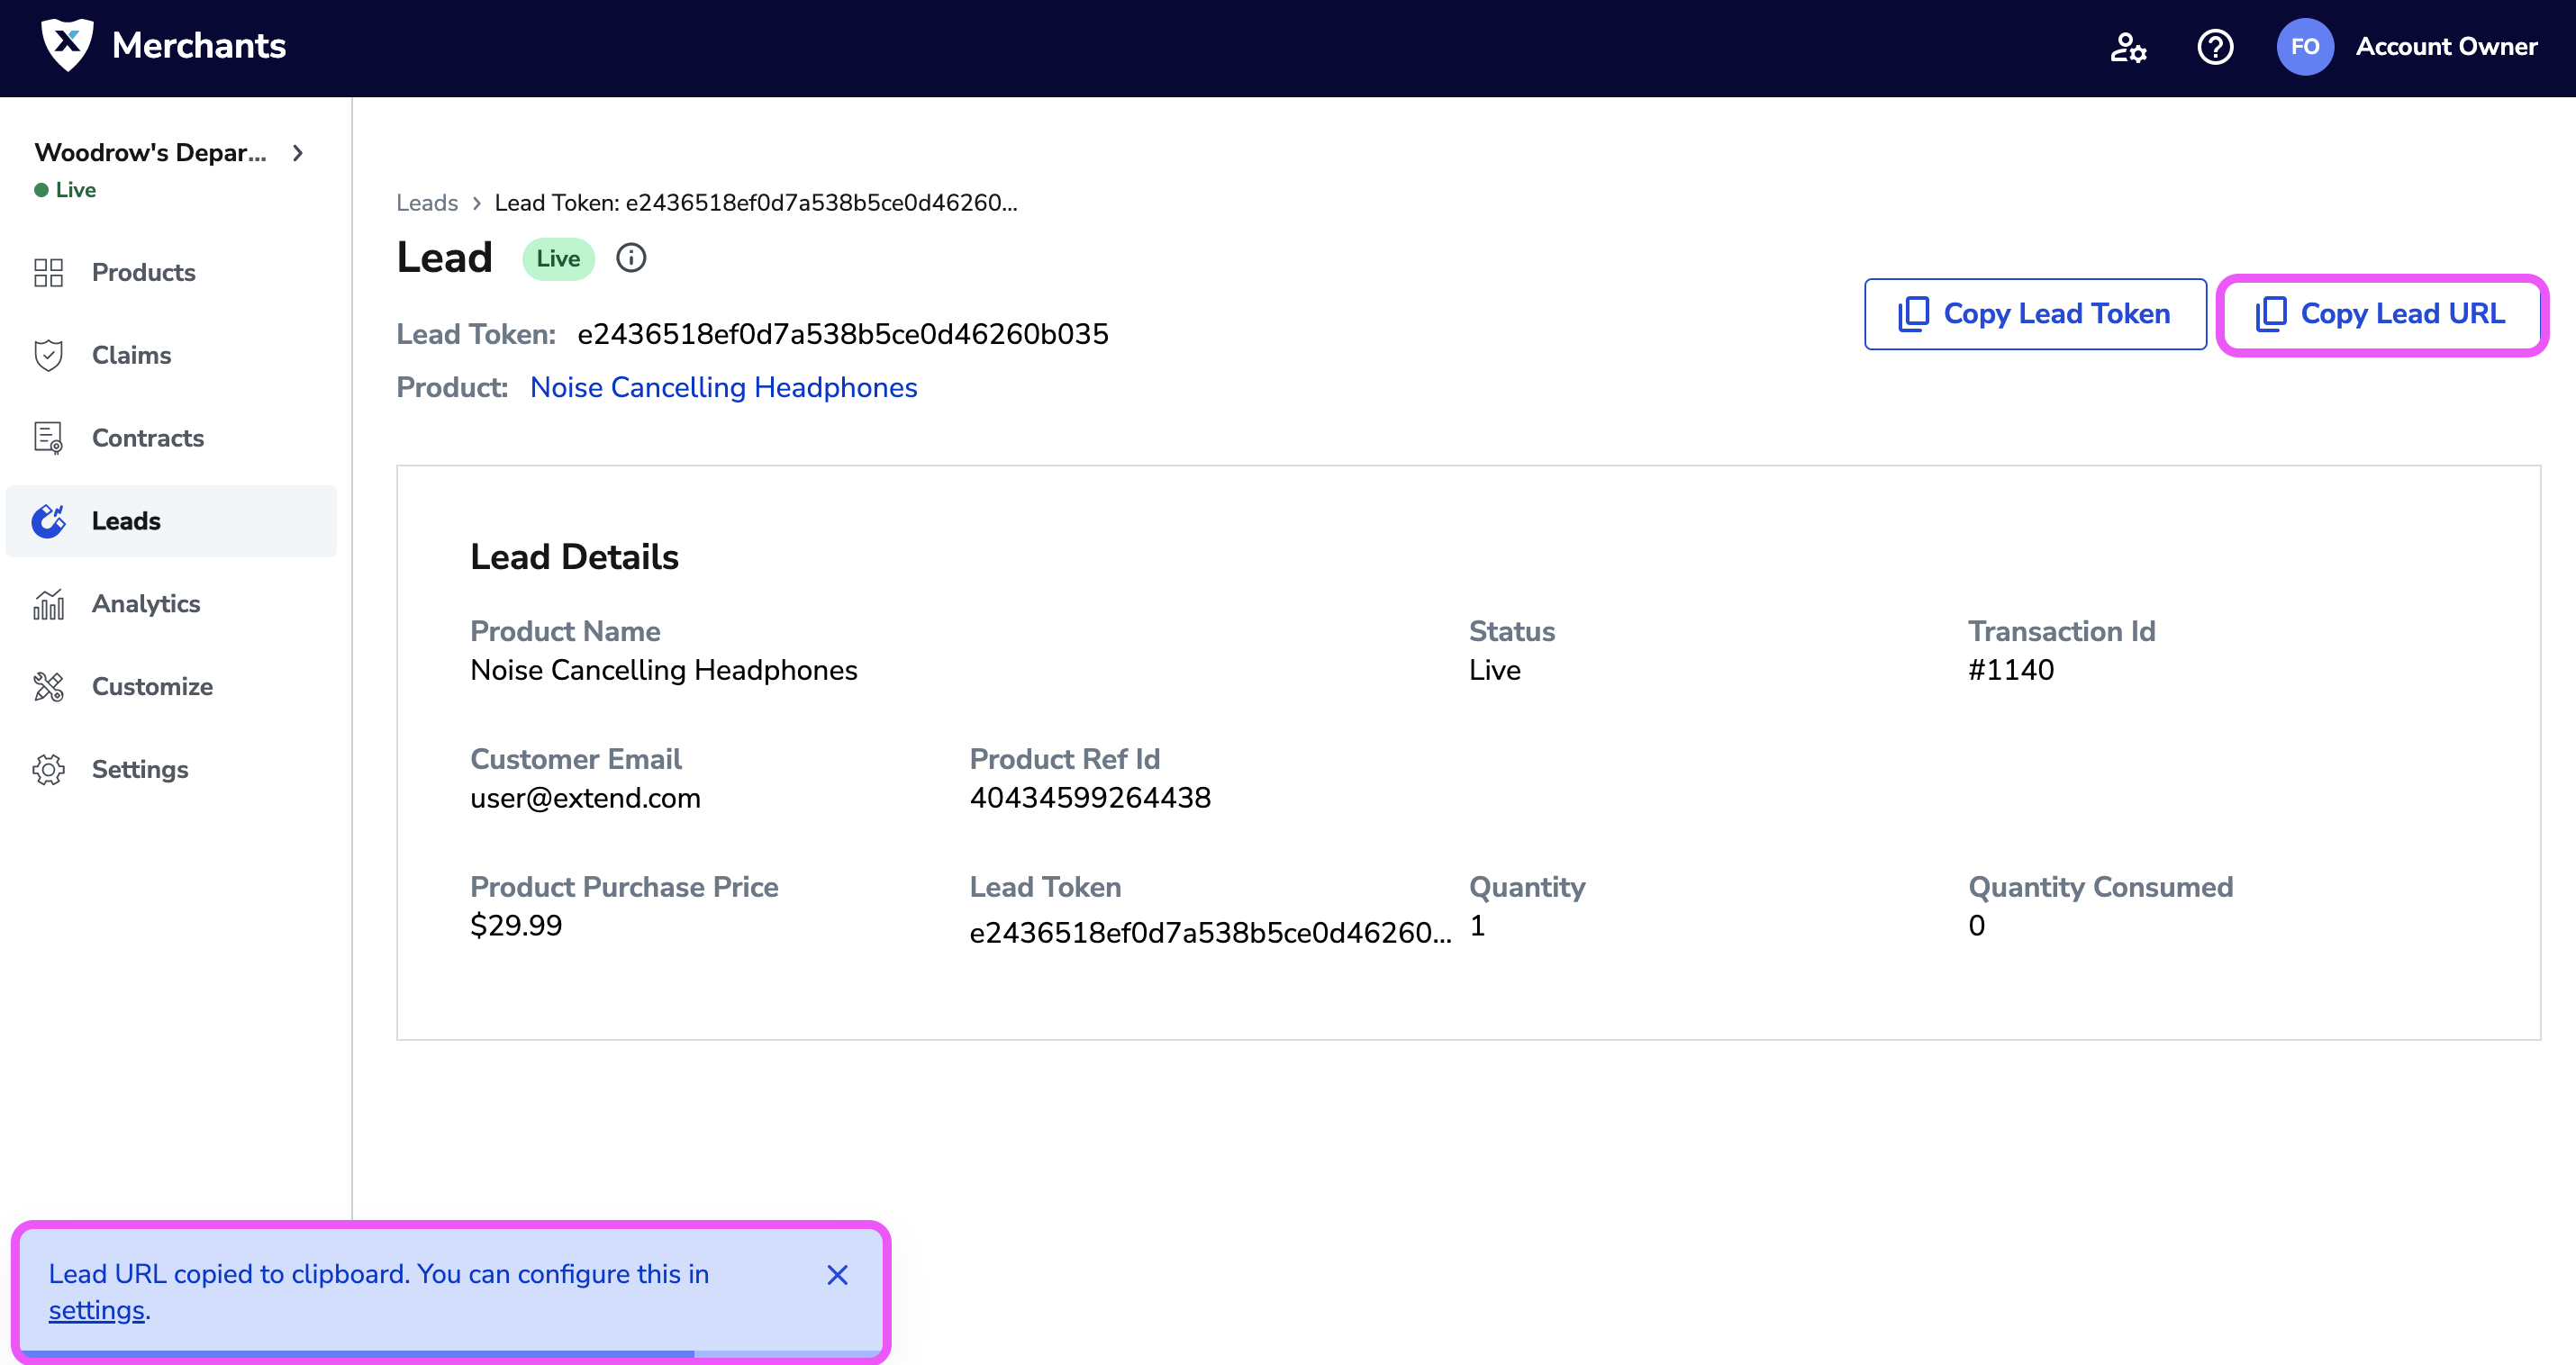
Copy Lead URL from Lead Detail View
- Log into the Merchant Portal
- On the left navigation bar, click on Leads
- Search or filter to find a specific lead
- Click on the lead in the list view
- From the lead detail view, click the Copy Lead URL button
When the lead URL has been successfully copied, you will see a message letting you know that the lead URL was successfully copied to your clipboard.
Create a single Lead Manually
Leads records are automatically created for merchants who are integrated with Extend's Orders API, or have previously integrated with Extend's Leads API. Users can also create a lead record manually when one is missing or expired, or to facilitate a warranty purchase for whatever reason after the initial sale of the product. To create a lead manually, follow the steps below.
- Log into the Merchant Portal
- On the left navigation bar, click on Leads
- Click the Create Lead button.
- Click on the lead in the list view

- Fill out the Lead information, using the field tool tips for guidance.
- The Extend Product Reference ID entered must match with a warrantable product in your Merchant Portal catalog that has a mapped warranty plan.
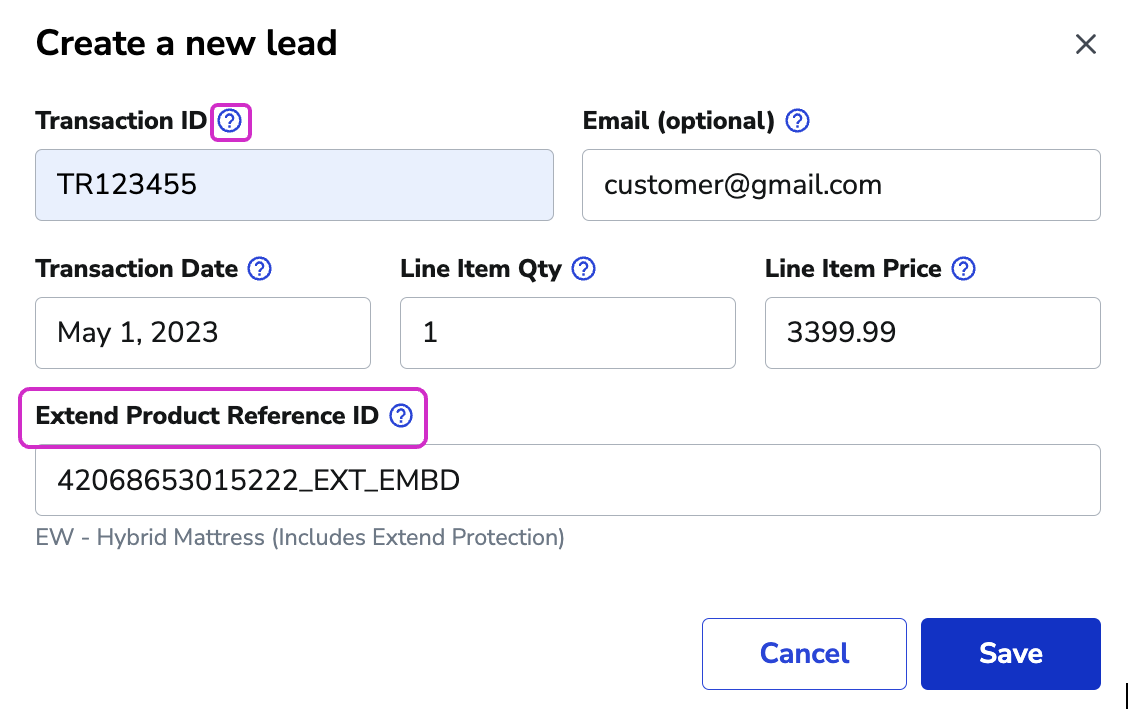
- Click Save
- Successful toast message will appear and you can navigate to the new Record in the Lead List, or by clicking the View Details link in the toast.

Field and Status Definitions
Every lead has a specific set of fields describing the details and status of the lead. The following fields are defined below. Additionally, you can view the field/status definitions within the Merchant Portal by hovering your cursor over column titles in your leads list view or clicking the information icon beside the Status field.
Leads List View Field Definitions
| Field Name | Field Definition |
|---|---|
| Transaction ID | Transaction ID in your system (typically order ID) |
| Date | Order creation date |
| Customer Name | Customer’s name |
| Customer Email | Customer’s email address |
| Product Ref ID | Product’s ID in your system (often same as SKU) |
| Product Name | Product name displayed to customers |
| Purch Price | Price customer paid for product after any discounts applied |
| Status | Current status of the lead |
Lead Details View Field Definitions
| Field Name | Field Definition |
|---|---|
| Product Name | Product name displayed to customers |
| Status | Current status of the lead |
| Transaction Id | Transaction ID associated with the initial order in your system (typically order ID) |
| Customer Email | Customer’s email address |
| Product Ref Id | Product’s ID in your system (often same as SKU) |
| Product Purchase Price | Price customer paid for product after any discounts applied |
| Lead Token | Unique ID of the lead in Extend's system |
| Quantity | Total number of leads available for post-purchase product protection sales. If the customer purchased two of the same product and did not purchase a warranty for either product, quantity would be '2' |
| Quantity Consumed | Total number of leads that have converted to contract sales |
Status Definitions
| Status Name | Status Definition |
|---|---|
| Live | The customer is eligible for a post-purchase Product Protection Offer |
| Consumed | The customer has already purchased the post-purchase Product Protection Offer |
| Expired | The customer eligibility for a post-purchase Product Protection Offer has expired |
Updated 4 months ago